How to Crochet an Amigurumi Wishing Star Plushie: Complete Construction Guide

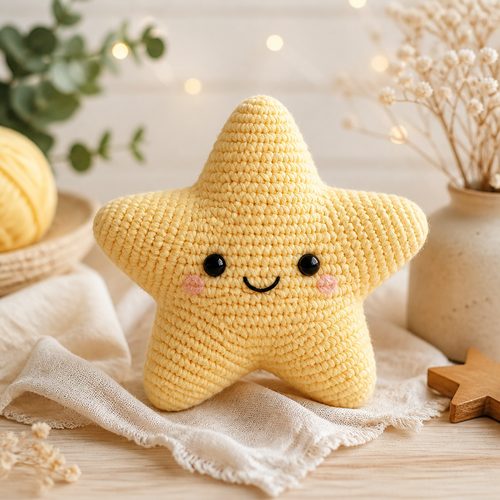
Wishing Star Amigurumi, free. Instant download, A4 and US Letter.
Get the free pattern
How do you crochet an amigurumi wishing star plushie?
What Is an Amigurumi Wishing Star Plushie?
An amigurumi wishing star plushie is a three-dimensional crocheted stuffed toy shaped like a classic five-pointed star and worked in the Japanese amigurumi tradition — known for chubby, rounded proportions and embroidered or safety-eye faces. Unlike a flat crocheted star appliqué, a wishing star plushie is constructed fully in the round and filled with polyester fiberfill to create a firm, squeezable shape that holds its form. The 'wishing star' design typically features a whimsical, dreamy face — softly closed eyes, a gentle smile, and rosy embroidered cheeks — that gives the finished toy its storybook quality. Because of that emotional appeal, wishing star plushies are consistently popular as handmade baby gifts, nursery shelf décor, and craft fair items. The Craftuary Wishing Star Amigurumi Crochet Pattern PDF is engineered to produce a consistently proportioned, shop-quality result with written instructions detailed enough for intermediate crocheters and clear enough that advanced makers can work efficiently.
Materials and Yarn You Will Need
To make a wishing star amigurumi plushie, gather a small quantity of DK or worsted weight yarn in your main star color — soft yellow, buttercream, or any pastel tone works beautifully — plus a contrast color if your design includes accent details or a separate face panel. A 3.5 mm or 4.0 mm crochet hook (US sizes E-4 to G-6) is the standard range for amigurumi because the tighter-than-label gauge closes the fabric enough to hide the stuffing between stitches. Beyond yarn and hook, you will need polyester fiberfill, a blunt yarn needle for seaming and embroidery, several stitch markers to track both the beginning of each round and the multiple live points you hold simultaneously, and either 6 mm–9 mm safety eyes or black embroidery floss for the face. If this plushie is intended for a baby or a child under three years old, always substitute fully embroidered eyes for safety eyes to eliminate any choking hazard — the Craftuary pattern includes instructions for both finishes. Having a stuffing tool or the eraser end of a pencil on hand is also highly recommended for pushing fiberfill cleanly into the narrow tips of each star point without distorting the stitches.
How the Five-Point Star Shape Is Constructed
The central engineering challenge in any amigurumi star pattern is building five symmetrical, evenly spaced points that join seamlessly without visible seam lines or puckering where each ray meets the body. In the Craftuary Wishing Star design, each of the five points is crocheted independently as a small tapered cone starting from a magic ring, worked in continuous single crochet rounds with incremental increases to build the point's shape — then set aside while the remaining four points are made. Once all five points are complete, a single joining round connects them at their open bases while simultaneously beginning the star's central body, which means you never have to sew any point on individually after the fact. The body then continues in joined rounds, with strategically placed decreases pulling the center into a slightly domed, pillow-like silhouette that gives the finished star its satisfying heft. This construction method is the professional standard for star-shaped amigurumi, and the Craftuary pattern breaks the joining round into clearly numbered steps with stitch counts confirmed at every stage so you can catch any errors before they propagate.
Key Crochet Techniques This Pattern Relies On
Wishing star amigurumi patterns draw on a specific toolkit of techniques, and knowing them before you begin saves significant time. The magic ring (also called an adjustable ring) is used to start each point, allowing you to close the center tightly so no hole shows at the tip — if you are uncomfortable with the magic ring, a slip-knot chain-2 join works as a substitute, though the center will be very slightly looser. Increases (two single crochets worked into the same stitch) build the gradual taper on each point, while the invisible decrease — worked by inserting your hook through the front loops only of two consecutive stitches — shapes the body and produces a neater, tighter closure than the standard sc2tog, which tends to leave small gaps on stuffed pieces. On the joining row, working through the back loop only of each base stitch creates a subtle ridge that visually defines where each point transitions to the body, adding professional dimension without any extra steps. For the face, the pattern provides exact round-and-stitch-column placement coordinates for the eyes, smile, and cheek blush so you are never left guessing whether the face will look centered and proportionate on the finished piece.
How to Stuff and Finish Your Wishing Star for a Professional Result
Proper stuffing technique is what separates a lumpy, misshapen star from one that looks shelf-ready or gift-worthy, and the sequence matters more than most beginners expect. Each of the five points must be lightly stuffed before the joining round is fully closed — fill each tip in small pinches, using a pencil or stuffing tool to push fiberfill all the way to the pointed end before adding more, and stop when the point feels firm but not rigid enough to splay outward past its natural angle. During the body rounds, add fiberfill in layers every few decrease rows rather than attempting to stuff through the final small opening, which makes it nearly impossible to distribute filling evenly and typically produces a lumpy center. To close the last round invisibly, cut your yarn leaving a 10–12 inch tail, thread it onto your yarn needle, and draw it through only the front loop of each remaining live stitch before pulling the tail snug — this flat closure sits flush with the body surface and is virtually undetectable. A final light steam block (hover an iron two inches above the surface without touching the yarn) can help settle any surface texture and coax the five points into perfectly even spacing if they shifted slightly during stuffing.
Where to Download the Craftuary Wishing Star Pattern PDF
The Craftuary Wishing Star Amigurumi Crochet Pattern is available as a professionally formatted instant-download PDF from the Craftuary shop at shopcedarcompass.com. The file includes a complete materials list, US-standard abbreviations glossary, written stitch-by-stitch instructions for all five points and the full body construction, confirmed stitch counts at the end of every round, and face placement diagrams showing exact positioning for eyes, smile, and cheek embroidery. Because it delivers as a digital download, you receive your file the moment your purchase is complete — no waiting for shipping and no risk of a package going missing. Craftuary patterns are priced to reflect genuine editorial investment: every design is tested by real crocheters before publication, and the PDF layout is designed for clarity at both screen and print size so you can work from a tablet or a printed copy with equal ease. Search 'Wishing Star amigurumi' in the Craftuary shop or visit the listing directly to purchase and start crocheting the same day.
Key Takeaways
- Each of the five star points is crocheted separately and connected in one joining round — no individual sewing of points required
- Use the invisible decrease (through front loops only) rather than standard sc2tog for a professional, gap-free body finish
- Stuff each point before closing the joining row so tips stay firm and symmetrical rather than flat or splayed
- Add body fiberfill in layers during decrease rounds, not all at once at the end, to avoid lumps
- Replace safety eyes with fully embroidered eyes for any plushie intended for babies or children under three
- The Craftuary PDF includes exact face placement coordinates so eyes, smile, and cheek blush are always centered and proportionate