How to Crochet a Sitting Highland Cow Amigurumi: Complete Pattern Guide

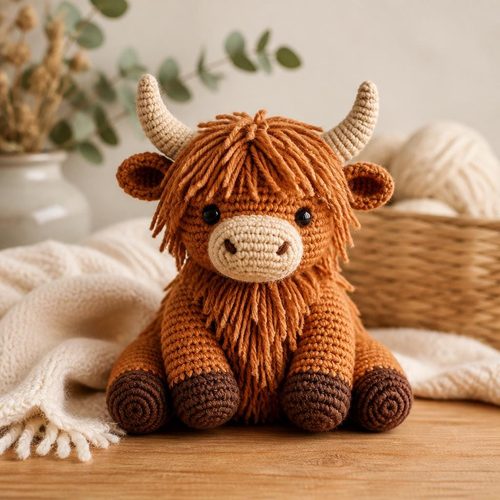
Highland Cow Crochet Pattern, $4.99. Instant download, A4 and US Letter.
See the pattern
How do I crochet a sitting Highland cow amigurumi stuffed animal?
What Is a Highland Cow Amigurumi and Why Is It So Popular?
A Highland cow amigurumi is a crocheted stuffed animal modeled after the famously shaggy, long-horned Scottish cattle breed — and it has become one of the most searched amigurumi patterns online over the past three years. The appeal is obvious: the breed's distinctive fringe of wavy hair over the eyes, wide curved horns, and stocky body translate perfectly into a charming, huggable plush toy. The sitting pose specifically is favored by crafters because it creates a compact, stable figure that photographs beautifully and makes an excellent gift or shelf display. Unlike standing amigurumi, which require careful weighting or wire armatures to stay upright, a sitting Highland cow has a wide, flat base that keeps it self-supporting. This combination of recognizable character design and practical construction is why the pattern consistently ranks among top-selling animal amigurumi on digital download platforms.
Materials You Will Need Before You Start
To crochet a sitting Highland cow amigurumi, you will need worsted-weight yarn in at least three colors: a warm brown or orange for the main body, an off-white or cream for the muzzle and leg accents, and a lighter tan or sandy shade for the shaggy forelock and chest fur. A 3.5mm or 4.0mm crochet hook is standard for worsted weight and produces a tight enough fabric to prevent polyfill stuffing from showing through. You will also need polyester fiberfill stuffing, plastic safety eyes (12mm is a common size for a medium-sized finished animal roughly 6–8 inches tall), stitch markers, a yarn needle for seaming and weaving in ends, and scissors. Optional but recommended: wire or pipe cleaners threaded inside the horns keep them pointed upward without drooping over time. Gathering all materials before you begin prevents mid-project interruptions and lets you focus entirely on the construction sequence.
Understanding the Magic Ring and Amigurumi Crochet Basics
Nearly every piece of a Highland cow amigurumi starts with a magic ring, also called a magic circle — a foundation loop that lets you pull the center closed so there is no hole at the tip of the body part. From the magic ring, you will work in continuous rounds rather than joined rounds, which means you never slip-stitch to close each round; instead you simply continue spiraling and use a stitch marker to track your round beginnings. The primary stitches used throughout are single crochet, invisible increases (two single crochets into the same stitch), and invisible decreases (inserting your hook through the front loops of two consecutive stitches before pulling through). Working into the back loop only (BLO) on specific rounds creates defined ridges useful for marking anatomical landmarks like the base of the neck or the division between the belly and back. If you are new to amigurumi, practicing these four techniques on a small sphere before starting the cow will save significant frustration during the main project.
Crocheting the Highland Cow Body for the Sitting Pose
The sitting Highland cow body is essentially an elongated oval sphere crocheted in one piece, then shaped by how you stuff it and position the legs. You begin with a magic ring, increase to 6 stitches, then continue increasing every round until you reach your target circumference — typically around 30–36 stitches for a medium-sized cow. The key shaping difference from a standing amigurumi is that the bottom of the body is worked slightly flatter: after your maximum stitch count, you work 2–4 even rounds before beginning your decreases, and you intentionally understuff the lower portion so the body settles into a seated position rather than remaining perfectly round. The hind legs are crocheted separately as short cylinders and attached to the lower sides of the body pointing slightly forward and outward, which visually "locks" the sitting pose. Front legs are shorter and thinner cylinders attached at the chest, bent slightly downward, giving the impression the cow is resting with its weight on its haunches.
Making the Signature Shaggy Hair, Horns, and Face Details
The shaggy forelock is what makes a Highland cow instantly recognizable, and in amigurumi it is typically created using a loopy stitch or by attaching individual cut yarn strands in a fringe technique. For the loopy stitch method, you wrap yarn around two or three fingers before pulling through to create loose loops on the right side of the fabric; work these stitches across the top of the head and upper forehead in the lighter tan or sandy color. The horns are crocheted as tight, narrow tubes — start with 6 stitches in a magic ring and increase to 8 before working straight rounds, then decrease back to 4 and finish with a slip stitch — and should be stuffed firmly before attaching. Position the safety eyes between the horns and the forelock fringe so that only the bottom half of each eye peeks through the hair, which gives the cow its characteristic shy, endearing expression. The muzzle is a small flattened oval sewn onto the lower face, with nostrils either embroidered using black yarn or created with small French knots.
Assembling, Stuffing, and Finishing Your Highland Cow
Assembly order matters for a clean finish: attach the ears before sewing on the head, attach the horns before adding the forelock fringe, and stuff each limb firmly before sewing it to the body so the yarn needle has resistance to work against. Use a whipstitch or ladder stitch for all seams, pulling gently but consistently to prevent visible gaps; the ladder stitch is invisible when done correctly and is worth learning if you plan to make multiple amigurumi. Before closing the body completely, adjust the stuffing so the base is slightly denser than the top — this low center of gravity is what keeps the finished cow upright without any additional support. Weave in all yarn ends by threading them through multiple layers of the fabric interior before trimming, which prevents them from working loose with handling over time. A light steam block over the finished piece (hold a steam iron 2–3 inches away, never touching the yarn) can even out any uneven stitches and give the finished cow a polished, professional look.
Where to Get a Tested Crochet Highland Cow Pattern With Full Instructions
A well-written digital pattern PDF removes all the guesswork from the process above by providing exact stitch counts for every round, labeled assembly diagrams, and notes on yarn substitutions. Craftuary offers a complete Crochet Sitting Highland Cow Amigurumi Pattern at shopcedarcompass.com at shopcedarcompass.com — priced at approximately $6, it is an instant digital download you receive immediately after purchase, meaning you can begin crocheting within minutes. The pattern includes full written instructions for every component (body, head, ears, horns, legs, tail, and forelock), a materials list with specific yarn weight and hook size recommendations, tips for achieving the sitting pose, and notes on how to safely attach safety eyes for toys intended for children over three. Digital PDF patterns are a cost-effective way to learn a new construction technique because you can print them, annotate them, and reference them on a tablet while your hands are free to crochet. Purchasing from an Craftuary digital download shop also means the file is saved to your account permanently so you never lose access.
Key Takeaways
- A sitting Highland cow amigurumi uses a slightly flattened body base and wide-set hind legs to achieve a stable, self-supporting seated pose without wire armatures.
- The signature shaggy forelock is created with loopy stitches or fringe yarn across the forehead in a lighter contrast color, with safety eyes positioned to peek through the fringe.
- Worsted-weight yarn with a 3.5–4.0mm hook produces tight enough fabric to conceal polyfill stuffing; 12mm safety eyes are standard for a 6–8 inch finished animal.
- Stuffing the body base more densely than the top creates a low center of gravity that keeps the finished cow upright on any flat surface.
- A tested PDF pattern from Craftuary provides exact round-by-round stitch counts, assembly diagrams, and safety-eye attachment notes for under $7.