How to Crochet an Amigurumi Koi Fish: A Complete Beginner's Guide

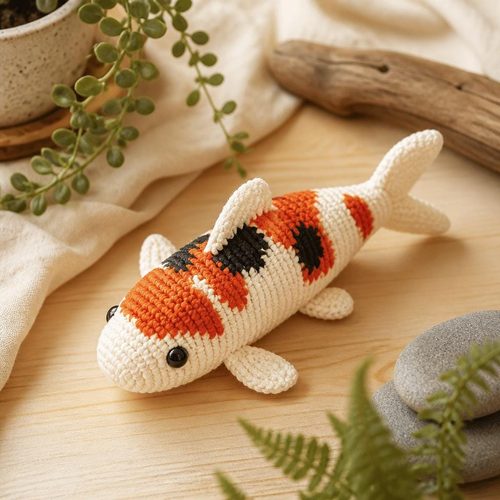
Koi Fish Amigurumi, $4.99. Instant download, A4 and US Letter.
See the pattern
How do I crochet an amigurumi koi fish for beginners?
What Is an Amigurumi Koi Fish and Why Make One?
Amigurumi is the Japanese art of crocheting small stuffed animals and characters, and koi fish are one of the most beloved subjects in this craft tradition. Koi carry rich symbolism — representing good luck, perseverance, and prosperity — which makes a handmade amigurumi carp a meaningful gift as well as a satisfying personal project. Unlike some amigurumi designs that require complex shaping, the elongated, symmetrical body of a koi fish is actually well-suited to beginners because the main body is worked in continuous rounds without complicated increases. The finished plush typically measures 6–8 inches from nose to tail, making it the perfect size for display, a nursery decoration, or a child-safe stuffed toy. A quality PDF pattern, like the one available from Craftuary for around $7, gives you all the stitch counts, round-by-round instructions, and color guidance in one printable or on-screen document.
Materials and Tools You Will Need
To crochet an amigurumi koi fish you will need worsted-weight yarn (Category 4) in at least two to three colors — traditionally white or cream for the base body, with orange, red, or black for the distinctive koi patches. You will also need a 3.5 mm or 4.0 mm crochet hook; the slightly smaller hook creates a tighter fabric that prevents your polyfill stuffing from showing through the stitches. Safety eyes in 9 mm or 12 mm are the standard choice for amigurumi, but for toys intended for children under three years old you should embroider the eyes in black yarn instead. Polyfill stuffing, stitch markers, a yarn needle for seaming and weaving ends, and small sharp scissors round out your toolkit. Optionally, wire armature inside the fins can help them hold a realistic swept-back pose, though a beginner-friendly pattern will design the fins to hold their shape through careful stitch construction alone.
Understanding the Basic Stitches Used in This Pattern
The overwhelming majority of amigurumi patterns — including a koi fish — rely on just three fundamental stitches: the magic ring (also called a magic circle), single crochet (sc), and slip stitch (sl st). The magic ring is how virtually every amigurumi piece begins; it lets you pull the starting loop completely closed so there is no hole at the center of your first round. Single crochet is the primary construction stitch, worked in a continuous spiral rather than joined rows, which is why stitch markers are essential — you place one at the start of each round and move it up as you go. Increases (working two single crochets into one stitch, abbreviated as inc) create outward curves to build the widest point of the fish body, while decreases (working two stitches together as one, abbreviated as sc2tog or dec) taper the piece back down toward the tail. If you can comfortably chain, single crochet, and slip stitch, you have every technical skill you need to complete this project.
Crocheting the Koi Body Step by Step
Begin with a magic ring and work 6 single crochets into it, then pull the ring closed — this forms Round 1. Rounds 2 through 4 use increases to expand the oval to approximately 18–24 stitches, giving the fish its rounded nose. From there, most beginner koi patterns maintain an even stitch count for 10–14 straight rounds (no increases or decreases), which forms the long cylindrical midsection of the body; this is the most meditative part of the project and a great opportunity to practice maintaining even tension. Once the body reaches full length, you begin the decreasing rounds that taper toward the tail socket — typically 4 to 6 rounds of sc2tog spread evenly around the round. Stuff the body firmly but not to the point of distortion before closing the final round; amigurumi that is under-stuffed looks limp and loses its shape over time, while over-stuffing can stretch the stitches and create gaps.
Making and Attaching the Fins and Tail
A koi fish typically has six fin elements: one dorsal fin along the top, two pectoral fins on the sides near the head, two pelvic fins lower on the body, and the distinctive forked caudal (tail) fin. Each fin is crocheted as a flat piece separately and then sewn on with a yarn needle, which lets you position them precisely before committing to the attachment. The tail is usually the most visually striking element — it is worked in two mirrored lobes with a chain of stitches at the base that you fold and seam to create the forked profile. When attaching fins, use the same yarn color as the fin (not the body) so that your stitching seams are invisible against the fin surface rather than against the body. Pin each fin in place with sewing pins or locking stitch markers before sewing so you can step back and check symmetry from multiple angles — asymmetric fin placement is the most common finish issue in fish amigurumi.
Adding Color Patches Like a Real Koi
The most iconic feature of a koi is its irregular color patterning, and you have two main options for recreating this in crochet: color changes within the rounds (intarsia or the carry-along method) or surface embroidery and appliqué added after the body is complete. For beginners, the appliqué method is strongly recommended — you simply crochet flat oval or irregular patches in your accent colors and sew them onto the finished body wherever you like. This approach also means you are not juggling multiple yarn balls during construction, which keeps tension consistent and the project less stressful. Traditional kōhaku koi are white with red patches; bekko koi feature a solid base with black tortoiseshell spots; and showa koi use black, red, and white together. There are no rules for patch placement — the beauty of a handmade amigurumi koi is that every single one can be uniquely patterned, just like real koi in a pond.
Finishing Touches: Eyes, Whiskers, and Safety Checks
Install your safety eyes before closing and stuffing the head — once the body is fully stuffed and seamed, you can no longer reach inside to secure the washers. The eyes should sit on either side of the head, roughly two to three rounds back from the nose tip; use a pin to test placement and hold them there while you look at the fish from the front to check that they appear level. Koi also have two pairs of barbels (whiskers) extending from the corners of the mouth, which you can recreate by threading doubled yarn through the tip of the snout and knotting it, then trimming to about half an inch. Weave in all yarn ends securely with at least two direction changes so they do not work their way out with handling. Finally, run a safety check: tug firmly on each safety eye, each fin, and each barbel to confirm everything is anchored; for gifts destined for young children, replace all safety eyes with embroidery and hand-sew all attachments with tight lock stitches.
Where to Get the Pattern and What to Expect from a PDF Download
Craftuary offers a complete Koi Fish Amigurumi Carp PDF pattern through their shop at approximately $7, which is a one-time purchase you download instantly and can print or reference digitally as many times as you need. The PDF format means there are no shipping delays and no waiting — you purchase, download, and start crocheting the same day. A well-constructed amigurumi PDF pattern includes a materials list, gauge information, abbreviations key, round-by-round stitch counts for every piece, assembly diagrams, and at least one finished-object reference photo so you know what the completed project should look like. You should expect to finish the entire koi fish in four to eight hours of crochet time spread across a few casual sessions, making it a realistic weekend project. If you get stuck, the pattern seller is typically reachable at shopcedarcompass.com messages and can clarify any step — reputable shops like Craftuary stand behind their patterns with responsive customer support.
Key Takeaways
- Amigurumi koi fish patterns require only three basic stitches — magic ring, single crochet, and slip stitch — making them genuinely accessible to beginners.
- Use worsted-weight (Category 4) yarn and a 3.5–4.0 mm hook for a tight fabric that keeps stuffing hidden inside the finished piece.
- The koi body is worked in a continuous spiral, not joined rows, so stitch markers are essential to track round beginnings.
- Color patches are easiest to add as crocheted appliqué pieces sewn onto the finished body rather than as mid-row color changes.
- Always install safety eyes before stuffing and closing the body — you cannot add them after the piece is seamed shut.
- Replace safety eyes with embroidery for any toy given to children under three years old.
- A PDF digital download pattern from Craftuary is available for around $7 and delivers instantly with no shipping wait.
- The finished amigurumi koi measures approximately 6–8 inches and makes a meaningful gift symbolizing luck and perseverance.