Free embroidery pattern ·
Reindeer Embroidery Pattern: Free Beginner Christmas Hoop
Free pattern. Beginner friendly. About 1.5 hours.
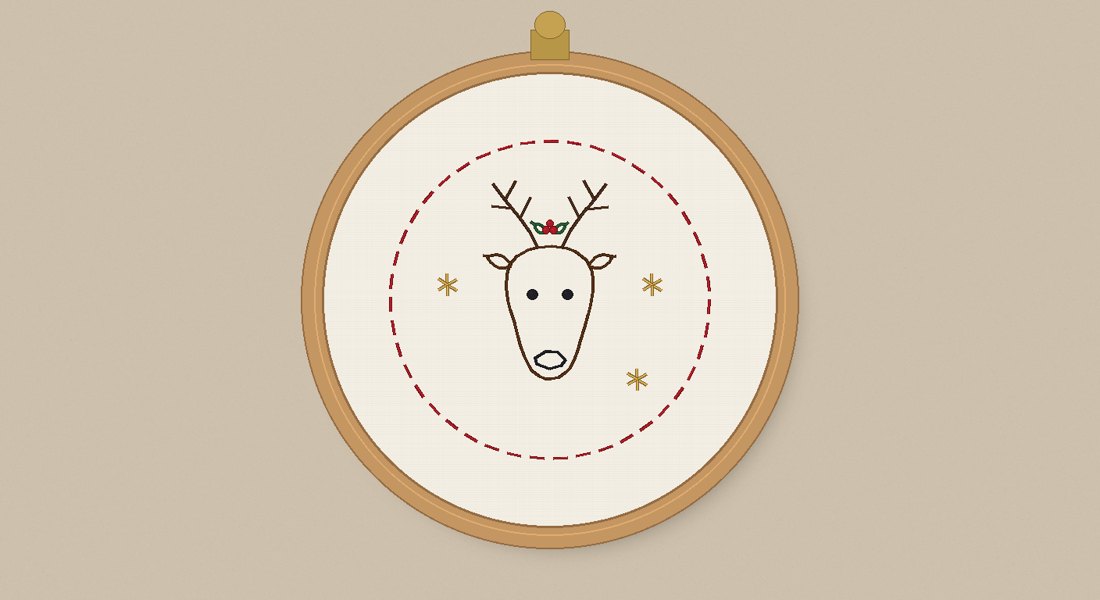
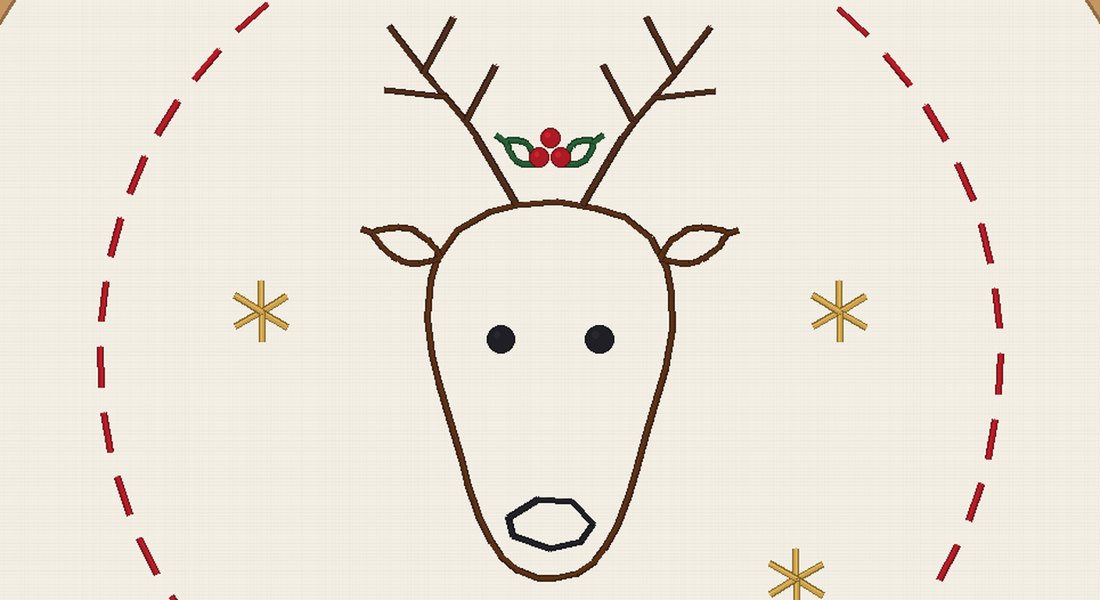
How do you make the reindeer embroidery hoop? This free reindeer embroidery pattern is a beginner Christmas hoop: a reindeer's head face on, outlined in brown backstitch so the fabric is the fur, with two dark brown branched antlers, lazy-daisy ears, French-knot eyes, a small black nose, a holly sprig between the antlers and three gold straight-stitch stars, inside a dotted red ring. Five stitches, six DMC colours, about 1.5 hours, with a true-size template.
| Finished size | about 4.2 in design in a 6 in (15 cm) hoop |
|---|---|
| Stitches | 5: running, back, straight, detached chain, French knot |
| Threads | 6 DMC colours, 2 strands |
| Fabric | Cream or natural linen, 10 x 10 in |
| Level | Beginner |
| Time | about 1.5 hours |
| Price | Free |
Printable PDF (free) Save it on Pinterest
What you need
- 10 x 10 in cream or natural linen or linen-cotton
- DMC floss: 321, 433, 801, 310, 699, 729 (one skein each)
- 6 in embroidery hoop and a size 7 embroidery needle
- Water-soluble fabric pen, scissors
How it's made, in short
- Transfer the design. Print the template at 100%, check the 1 in square, and trace it onto the fabric with a water-soluble pen.
- Hoop the fabric. Put the fabric in a 6 in hoop, drum tight.
- Step 1. Stitch the dotted red ring around the design in running stitch.
- Step 2. Backstitch the head outline in brown in one closed line: across the forehead, down the cheek, round the muzzle and back up the other cheek; leave the inside unstitched, the fabric is the fur.
- Step 3. Work the two ears as brown detached chains (lazy daisies), each starting at the top corner of the head and pointing out and a little up.
- Step 4. Backstitch each antler in dark brown: first the long beam from the top of the head up and outwards, then its three short tines, each starting on the beam.
- Step 5. Add two black French knots for the eyes.
- Step 6. Backstitch the small oval nose in black at the bottom of the muzzle.
- Step 7. Between the antlers, work two small green detached chains for the holly leaves, one pointing left and one pointing right.
- Step 8. Add three red French knots where the two leaves meet for the holly berries: two side by side and one just above them.
- Step 9. Work each of the three stars as six gold straight stitches out from one centre point (18 stitches).
- Finish. Rinse out the pen lines, press, re-hoop and gather the back with a running stitch.
Free guides: Free embroidery patterns · How to do a French knot in embroidery · How to cross stitch · Cross stitch pattern maker
Tips
- Keep the backstitches about 1/8 in long round the cheeks and muzzle; shorter stitches make smoother curves.
- Stitch the antler beams before the tines, so each tine can start right on the beam.
- Wrap French knots twice and keep them snug; the eyes look best small and round.
The free pattern
Stitch names follow the common English names; lazy daisy is the same stitch as detached chain.
Size: design about 4.2 x 4.2 in (11 x 11 cm), for a 6 in (15 cm) hoop
Fabric: a 10 x 10 in (25 x 25 cm) square of cream or natural linen or linen-cotton, washed and pressed
Threads: DMC 6-strand embroidery floss, one skein of each colour; use 2 strands throughout. Lengths are the 2-strand thread you stitch with, with spare, cut in 18 in (45 cm) pieces:
- DMC 321 Red: about 33 in (84 cm)
- DMC 433 Medium Brown: about 29 in (74 cm)
- DMC 801 Dark Coffee Brown: about 18 in (46 cm)
- DMC 310 Black: about 16 in (41 cm)
- DMC 699 Green: about 6 in (15 cm)
- DMC 729 Medium Old Gold: about 11 in (28 cm)
Notions: 6 in embroidery hoop, size 7 embroidery needle, water-soluble fabric pen or a light pencil, scissors
Stitches: running stitch, backstitch, straight stitch, detached chain (lazy daisy), French knot
Transfer
Print the template page at 100% (actual size) and measure the 1 in scale square; if it is not exactly 1 in, check the print setting. Tape the template to a window, centre the fabric over it and trace the head, the ears, the antlers, the eyes and nose, the holly leaves and berries, the stars and the ring with the pen.
Put the fabric in the hoop so it is drum tight, with the screw at the top.
Stitch guide
Running stitch: Bring the needle up on the line, go down 1/8 in further along, come up again 1/16 in on, and repeat, so you get even dashes with gaps between them.
Backstitch: Bring the needle up one stitch length along the line, go down at the start of the line, then come up one stitch length ahead of your last stitch and go back down into the end of it, so the stitches touch.
Straight stitch: One single stitch: come up at the inner end of the line and go down at the outer end, keeping the thread smooth and not too tight so it lies flat.
Detached chain: Also called lazy daisy. Come up at the base of the petal, go back down in the same hole leaving a loop, come up at the tip of the petal inside the loop, and go down just outside the loop to tack it in place.
French knot: Come up where the knot goes, wrap the thread twice around the needle, hold the wraps snug with your other hand, and go down right next to where you came up, pulling the thread through slowly.
Order of work
- Stitch the dotted red ring around the design in running stitch. DMC 321, 2 strands.
- Backstitch the head outline in brown in one closed line: across the forehead, down the cheek, round the muzzle and back up the other cheek; leave the inside unstitched, the fabric is the fur. DMC 433, 2 strands.
- Work the two ears as brown detached chains (lazy daisies), each starting at the top corner of the head and pointing out and a little up. DMC 433, 2 strands.
- Backstitch each antler in dark brown: first the long beam from the top of the head up and outwards, then its three short tines, each starting on the beam. DMC 801, 2 strands.
- Add two black French knots for the eyes. DMC 310, 2 strands.
- Backstitch the small oval nose in black at the bottom of the muzzle. DMC 310, 2 strands.
- Between the antlers, work two small green detached chains for the holly leaves, one pointing left and one pointing right. DMC 699, 2 strands.
- Add three red French knots where the two leaves meet for the holly berries: two side by side and one just above them. DMC 321, 2 strands.
- Work each of the three stars as six gold straight stitches out from one centre point (18 stitches). DMC 729, 2 strands.
Finishing
- Rinse the fabric in cool water to remove the pen lines, roll it in a towel and press it face down on a soft towel.
- Put it back in the hoop centred, tighten the screw, and trim the fabric to 1 in outside the hoop.
- Run a running stitch around that edge, pull it up at the back like a drawstring, and tie off.
Counts: 43 running stitch dashes in the ring, 1 backstitched brown head outline, 2 lazy-daisy ears, 2 dark brown antlers (1 beam and 3 tines each, 8 backstitch lines), 2 French-knot eyes, 1 backstitched black nose, 2 lazy-daisy holly leaves, 3 French-knot berries, and 3 stars of 6 straight stitches each (18).
How we checked it: xstitchlib/embroidery.py: 5 stitch names in the dictionary, each explained; 6 DMC threads listed and used; hoop 6 in for the design; scale square; lengths fit one skein each. We work hard to get every number right, but mistakes can still happen; tell us at hello@craftuary.com if anything is off.
Want it on paper?
The printable PDF (US Letter and A4) is free with a Craftuary account.
Get free PDFQuestions
How do you embroider a reindeer?
Backstitch the head outline in one line, add the ears as lazy daisies, then backstitch each antler as a long beam with short tines branching off it, and finish the face with French-knot eyes and a small backstitched nose.
How do I stitch reindeer antlers?
Stitch the long beam first, from the head up and outwards, then add each tine as a short backstitch line that starts on the beam, so the branches join cleanly.
How big is this reindeer embroidery?
The design is about 4.2 inches across and fits a 6 inch hoop with room around it.
Can I add a name under the reindeer?
Yes. Write the name lightly under the muzzle with the fabric pen, inside the ring, and backstitch it in red or green with 2 strands; move the lower star if the name is long.
The pictures are drawn from the pattern's own measurements and stitches; your finished piece will vary a little with your materials.
- Christmas Star Embroidery Pattern: Free Beginner Hoop
- Penguin Embroidery Pattern: Free Christmas Beginner Hoop
- Christmas Gnome Embroidery Pattern: Free Beginner Hoop
- Christmas Stocking Embroidery Patterns Free: Beginner Hoop
- Snowman Embroidery Patterns Free: Beginner Christmas Hoop
- Gingerbread Man Embroidery Pattern: Free Beginner Christmas Hoop
Embroidery and cross stitch patterns: every embroidery pattern on Craftuary.
Embroidery guides: free how-to guides.
Other crafts: Crochet patterns · Sewing patterns · Knitting patterns