How to Sew a Boho Wrap Top at Home: Complete Guide to the Kimono Sleeve Knot Blouse Pattern

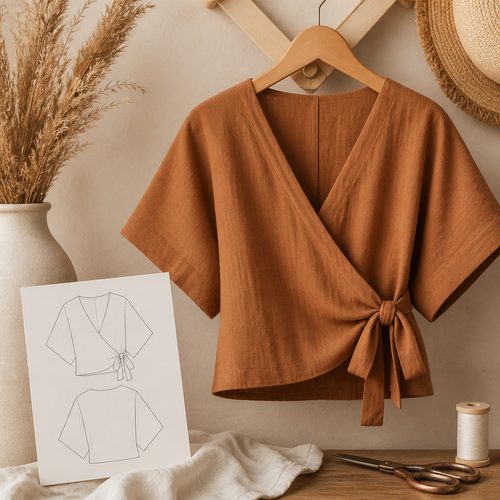
Boho Wrap Top Pattern, $4.99. Instant download, A4 and US Letter.
See the pattern
How do I sew a boho wrap top with kimono sleeves and a front knot at home?
What Is a Boho Wrap Top — and Why Make One Instead of Buy One?
A boho wrap top is a relaxed, flowy blouse that wraps across the front of the body and ties at the waist, creating a V-neckline and a customizable fit that flatters a wide range of body types. The kimono sleeve variation extends the sleeve as a continuous panel from the bodice — meaning there's no traditional set-in sleeve to sew, which eliminates one of the trickiest steps in garment construction. Because the fit is adjustable at the tie, this style works across multiple sizes without grading or fitting adjustments, making it an ideal first wearable garment project. Ready-to-wear versions in boutiques routinely retail for $45–$90, but using a PDF sewing pattern from Craftuary, you can sew one at home for the cost of fabric — often under $15. Beyond savings, sewing your own means full control over fabric choice, print scale, and sleeve length, so no two versions look identical.
Choosing the Right Fabric for a Boho Wrap Top
Fabric choice is the single most important decision you'll make for this project, because the drape of the fabric determines how the wrap front hangs and how the front knot behaves. Lightweight wovens work best: rayon challis, cotton gauze, linen, Tencel, or a cotton-linen blend will all drape softly and create that characteristic flowy silhouette. Avoid stiff quilting cotton or canvas — they don't have enough drape to wrap smoothly and the front panels will gape instead of fall. For a true boho aesthetic, look for floral prints, abstract watercolor patterns, or solid earthy tones like terracotta, sage, and cream. Budget roughly 1.5 to 2 yards for most sizes, though the pattern instructions will specify yardage by size, and always pre-wash your fabric before cutting to prevent shrinkage after the garment is complete.
What's Included in the Craftuary PDF Sewing Pattern
The Craftuary Boho Wrap Top PDF pattern is an instant-download file, meaning you receive it immediately after purchase and can print it as many times as you need on standard US letter or A4 paper. The pattern includes multiple size options, a tile assembly guide with alignment marks so you can tape the pages together accurately, and a full-size test square so you can confirm your printer hasn't scaled the pages incorrectly before cutting fabric. Written instructions walk through each construction step with labeled diagrams, and the pattern pieces are labeled clearly with grain lines, notches, and fold lines. Because it's a digital file, you never have to worry about losing it — simply re-download from your Craftuary purchases page whenever you need a fresh copy or want to make the top in a new size.
Printing, Assembling, and Cutting the PDF Pattern Pieces
Print the PDF at 100% scale — never choose 'fit to page' in your printer settings, as this shrinks the pattern and will cause your finished garment to be the wrong size. After printing, locate the 1-inch or 2-inch test square on the first sheet and measure it with a ruler before assembling anything; if it measures correctly, proceed to tape the pages together following the assembly diagram included in the file. Trim the white margins on the printed sheets as indicated (usually the right and bottom edges), then align and tape the pages in rows, working left to right. Once assembled, cut out each pattern piece along the correct size line — if this is your first time, stick to one size; experienced sewists can blend between sizes at the bust and waist. Transfer all notches and markings to your fabric pieces using tailor's chalk or a water-soluble marker before removing the paper pattern.
Sewing the Kimono Sleeves: Step-by-Step
The kimono sleeve is cut as one continuous piece with the bodice front or back panel, meaning there is no armhole seam to set in — instead, you sew a single underarm and side seam that runs from the sleeve hem all the way down to the garment hem. Begin by placing your front and back bodice pieces right sides together and pinning along this continuous side-and-sleeve seam. Sew from the sleeve hem toward the underarm point using a straight stitch at your machine's standard seam allowance (usually ⅝ inch), then pivot at the underarm and continue down the side seam to the hem. Clip the curved underarm seam allowance at intervals so it lies flat when pressed open — this step prevents puckering at the underarm when you wear the top. Press the seam open with a hot iron, then fold and press the sleeve hem before topstitching or hand-stitching it closed for a clean finish.
Creating the V-Neck Opening and Wrap Front Panels
The V-neckline on a boho wrap top is formed by the two overlapping front panels — there is no neckline facing or bias tape required because each front panel is finished along its inner straight edge before the top is assembled. Start by folding and pressing a narrow double-fold hem (typically ¼ inch, then another ¼ inch) along the inner front edge of each panel, then topstitch close to the folded edge to keep it flat. When both front panels are hemmed and the shoulder seams are joined, the panels naturally cross at the center front to form the V shape, with the depth of the V determined by how far you pull the panels across before tying. A deeper V gives a more open, dramatic neckline, while a shallower overlap creates a more modest look — the wrap construction lets you adjust this every time you put the top on. Make sure to reinforce the neckline seam at the shoulder join with a second pass of stitching, since this area bears the tension of the tied front.
Tying the Front Knot: Technique and Variations
The front knot is what distinguishes this blouse from a basic wrap top — instead of tie strings that wrap around to the back, the excess fabric at the hem of the front panels is gathered and knotted at the center front, creating a casual, effortless detail that also shortens the hem to crop-blouse length. To tie it, hold both front panel tails at their lowest points, overlap them once, then tuck one tail up through the gap to form a simple overhand knot pulled snug at your natural waist or just below. For a more polished look, arrange the knot so both tails hang at equal lengths and the knot sits centered on your body. If you prefer a longer, tunic-length blouse, many sewists simply skip the knot entirely and let the front panels hang loose — both options work with this pattern. You can also experiment with a side knot by pulling both tails to one hip before knotting, which works especially well with large-scale prints to keep the focal point visible on the front bodice.
Beginner Tips for Getting Professional Results
Press every seam with an iron immediately after sewing it — this single habit makes the difference between a homemade-looking garment and a polished, professional finish. If your fabric is slippery (like rayon or Tencel), use pattern weights instead of pins to hold pieces in place while cutting, and sew slowly with a new needle to prevent skipped stitches. A ballpoint or stretch needle can help even with stable wovens that have a slightly looser weave, like cotton gauze. Before cutting into your fashion fabric, do a quick test sew of the underarm curve on a scrap to confirm your tension and stitch length are correct — adjusting on a scrap saves you from ripping out a finished seam. Finally, because the wrap top has very little structural shaping, any small imperfection in seam allowance width tends to self-correct in the finished garment, making this one of the most forgiving beginner sewing projects available.
Key Takeaways
- A boho wrap top with kimono sleeves has no set-in sleeves, making it beginner-friendly — the sleeve is cut as one piece with the bodice and sewn in a single continuous side seam.
- Lightweight woven fabrics like rayon challis, cotton gauze, or linen are required for proper drape; stiff fabric will not wrap or knot correctly.
- Print PDF sewing patterns at exactly 100% scale and always verify the test square with a ruler before assembling pattern pieces.
- The front V-neck depth is fully adjustable each time you wear the top — simply pull the panels deeper or shallower before tying.
- The front knot can be styled at center or side, tied or untied for a tunic length, giving one pattern multiple distinct looks.
- Pressing every seam with an iron immediately after stitching is the most impactful habit for achieving professional-looking results at home.
- The Craftuary PDF pattern is an instant digital download, re-downloadable as many times as needed from your Craftuary purchases page.