How to Make a Crochet Floppy Cat Toy: Complete Guide + Free Pattern Tips

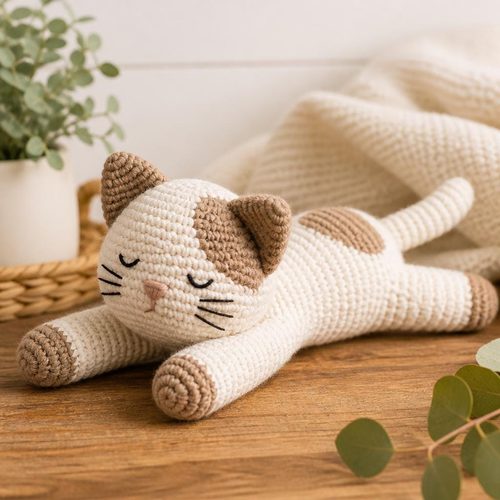
Floppy Cat Crochet Pattern, $4.99. Instant download, A4 and US Letter.
See the pattern
How do I crochet a floppy cat toy?
What Is a Floppy Cat Crochet Toy?
A floppy cat crochet toy is an amigurumi-style stuffed animal designed with intentionally loose, limber limbs that drape and dangle rather than hold a rigid pose. Unlike traditional stuffed cats that stand or sit upright, the floppy cat's arms and legs are crocheted without internal wire armatures, relying instead on yarn weight, stitch tension, and minimal stuffing to create that signature soft, ragdoll silhouette. These toys have surged in popularity on handmade marketplaces because they photograph beautifully draped over shelves, baskets, and plant pots. They make excellent gifts for cat lovers, nursery décor, and beginner-friendly amigurumi projects that still yield an impressive finished piece. The design typically features a round head, an elongated body, four long dangling legs, a tail, and embroidered or safety-eye facial features.
Materials You Will Need Before You Start
To crochet a floppy cat toy, you will need a worsted-weight or DK-weight yarn in your chosen cat colorway — neutral tones like cream, grey, and caramel are perennially popular, though tabby stripes and calico patches work beautifully too. You will need a 3.5 mm or 4.0 mm crochet hook depending on your tension; a tighter gauge produces a denser fabric that holds polyester fiberfill without gaps, while a looser gauge enhances the floppy drape of the limbs. Essential notions include polyester fiberfill stuffing (used sparingly in the limbs to keep them limp), a yarn needle for seaming, two 10–12 mm safety eyes or black embroidery floss for eyes, and stitch markers to track rounds. Optional but recommended: a small amount of blush-pink yarn or craft felt for inner ears and nose detail. The entire project typically uses under 100 grams of main color yarn, making it an ideal stash-buster project.
Key Crochet Stitches and Techniques Used
The floppy cat pattern relies almost entirely on single crochet (sc) worked in continuous rounds — the same fundamental technique used across nearly all amigurumi. You will use a magic ring (also called a magic circle) to start the head and body pieces without a visible hole at the center, then increase and decrease using sc2tog to shape the rounded forms. The legs and arms are crocheted as long tubes: simply work even rounds of single crochet with no increases or decreases after the initial few rounds, which naturally creates the tubular, drooping shape. Joining pieces uses the invisible seam method or whip stitch depending on personal preference; the invisible seam leaves a cleaner finish on the head-to-body join. If your pattern includes surface embroidery for whiskers or facial expressions, a basic straight stitch and a sharp tapestry needle are all that's required — no additional embroidery experience needed.
Step-by-Step Overview: Building Your Floppy Cat
Begin with the head: start a magic ring, work 6 single crochets into the ring, then increase each round according to your pattern until you reach the target head diameter (typically 10–12 rounds for a palm-sized cat). Before closing the head, insert safety eyes between rounds 8 and 9, approximately 5–6 stitches apart, and embroider a small nose triangle below them. Next, crochet the body as a slightly smaller oval — it should be elongated rather than round so the cat has a natural torso shape when the limbs hang from it. Stuff the head firmly and the body lightly, then seam them together with the head tilted very slightly forward for a natural, endearing look. Crochet all four legs as matching tubes (front legs slightly shorter than back legs), stuff each with just a small pinch of fiberfill at the top third only, and sew them to the body sides so they drape downward naturally. Finally, attach a long, gently tapered tail and add the ears — flat half-circle pieces seamed to the top of the head — and your floppy cat is complete.
How to Achieve the Signature Floppy, Ragdoll Effect
The floppy effect comes down to three variables: stuffing amount, yarn weight, and limb length. Use significantly less stuffing in the arms and legs than you instinctively want to — the limbs should feel almost hollow at the tips and only lightly padded at the attachment point so gravity does its work. Choosing a softer, drapier yarn such as a cotton-acrylic blend or a mercerized cotton gives the finished toy more fluid movement than a stiff 100% acrylic would. Limb length matters enormously: front legs should ideally measure at least 1.5 times the body length, and back legs should be even longer to create that classic sprawling pose. When you sew the limbs on, attach them at a slight outward and downward angle rather than straight to the sides — this prevents the legs from sticking out horizontally and encourages them to fall naturally. Blocking the finished toy with a light steam or a gentle wet block and then positioning it in the desired pose while it dries can also help set the drape permanently.
Where to Find the Floppy Cat Crochet Pattern
A professionally written, tested floppy cat crochet pattern takes all the guesswork out of the project by providing exact stitch counts, round-by-round instructions, labeled photographs of each construction stage, and clear notes on yarn substitutions. Craftuary offers a digital download floppy cat crochet pattern at shopcedarcompass.com and on their shop for around $8–9 — an instant PDF download you can access immediately after purchase and print as many times as you need. Digital patterns are the preferred format for most crocheters today because you can zoom in on stitch diagrams on a tablet, annotate your progress directly in a PDF reader, and never worry about losing a paper booklet. Patterns in this price range from established digital download shops are typically written by experienced amigurumi designers and include sizing notes so you can scale the cat up with bulkier yarn or down with fingering weight for a miniature version. Purchasing a pattern also supports independent designers and gives you a reliable, tested reference rather than piecing together a free tutorial from multiple incomplete sources.
Key Takeaways
- A floppy cat crochet toy uses minimal limb stuffing and long tubular legs to create a ragdoll drape effect — no wire armature needed.
- The entire project is worked in single crochet in the round, making it accessible to beginners who know basic amigurumi techniques.
- Yarn choice matters: a soft cotton-acrylic blend drapes more naturally than stiff 100% acrylic, enhancing the floppy silhouette.
- Stuff the head firmly, the body lightly, and the limbs with just a small pinch of fiberfill at the top to achieve the signature look.
- Craftuary's digital download pattern (~$8–9) provides tested, round-by-round instructions with photos for a polished finished toy.
- Safety eyes should be inserted before closing the head — between rounds 8 and 9, spaced 5–6 stitches apart for natural cat proportions.
- The pattern is an excellent stash-buster, typically using under 100 grams of main color worsted or DK yarn.