How to Crochet a Floppy Cat Stuffed Toy: Pattern Guide, Materials, and Tips for Getting That Perfect Limp Look

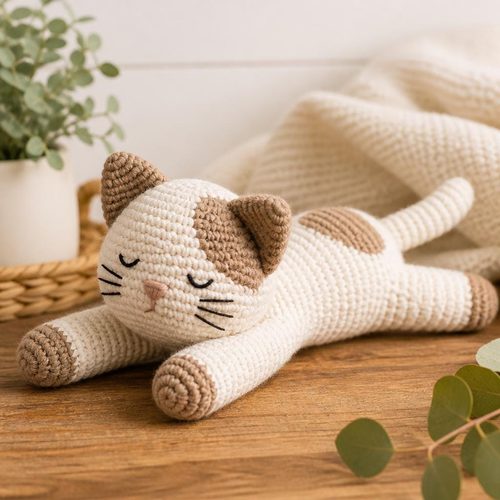
Floppy Cat Crochet Pattern, $4.99. Instant download, A4 and US Letter.
See the pattern
How do you crochet a floppy cat stuffed toy?
What Is a Floppy Cat Crochet Toy?
A floppy cat crochet toy is a soft, amigurumi-inspired stuffed animal defined by its relaxed, drooping limbs and loosely-stuffed body that gives it a limp, cuddly quality entirely different from the upright rigidity of traditional amigurumi figures. The 'floppy' effect is achieved intentionally by under-stuffing the legs and tail so they drape naturally rather than hold a fixed position when the toy is set down or held. These toys have become enormously popular as handmade gifts for babies, children, and cat lovers of all ages, partly because they photograph beautifully against any background and partly because they have an irresistible, squishy charm that stiff stuffed animals simply cannot replicate. Unlike standard stuffed animals, floppy cat toys typically incorporate realistic cat details — pointed ears, a long draping tail, embroidered whiskers, and a small triangular nose — making them feel like a stylized yarn portrait of a real pet. The design also lends itself to endless color customization, so crafters routinely make them in calico, tabby, tuxedo, or solid-color variants to match a recipient's actual cat.
Materials You Need Before You Start
To crochet a floppy cat toy you will need worsted-weight yarn in your chosen cat color (approximately 100 to 150 yards for the main body, with small contrasting amounts for markings or accent colors), a 3.5mm or 4.0mm crochet hook, polyester fiberfill stuffing, one pair of 10–12mm safety eyes, and a blunt yarn needle for seaming and weaving in ends. Worsted-weight yarn is the most beginner-friendly choice because it works up quickly, holds its shape well enough to support the toy's structure, and produces a soft finished texture that feels pleasant as a gift or keepsake. Safety eyes are the standard choice for toys intended for children over three years old, but if the recipient is an infant or very young toddler, fully embroidered eyes made from black yarn are the safer alternative since they have no removable hardware. You will also want a small amount of black or pink embroidery floss for the nose and optional whisker lines, plus straight pins to hold pieces in place during assembly before you sew them permanently. Stitch markers are genuinely useful for this project because floppy cat patterns work in continuous spiral rounds — having a marker at the start of each round prevents counting errors that compound quickly across a multi-piece pattern.
Key Stitches and Techniques You Need to Know
Most floppy cat patterns rely on a core set of crochet stitches: the magic ring (also called an adjustable ring), single crochet, increases (two single crochets worked into one stitch), and the invisible decrease (sometimes written as invdec or sc2tog). If you are comfortable executing these four techniques, you can complete a floppy cat toy regardless of whether you identify as a beginner or an intermediate crocheter — no advanced stitches are required. The invisible decrease is worth practicing on a swatch before you begin the actual toy, because it creates a much tighter, neater closure than a standard decrease and prevents the small gaps that can appear in amigurumi fabric and expose the stuffing underneath. Working in continuous rounds rather than joined rounds with a slip stitch is the standard method for amigurumi-style construction, and it results in a seamless, polished exterior with no visible join lines running down the sides of the finished piece. Some floppy cat patterns also include a surface slip-stitch technique for adding stripe details or tabby markings without requiring mid-round color changes, which meaningfully simplifies the process for newer crafters who find yarn management across color changes frustrating.
Construction Order: How the Pattern Comes Together
A well-structured floppy cat pattern is built in a specific sequence: head first, then body, then the four limbs (two front legs and two back legs), then the tail, and finally the flat triangular ears. The head is crocheted outward from a magic ring in increasing rounds to form a sphere; safety eyes must be inserted and the backing washers snapped on before you decrease the opening closed and stuff the head, because you cannot feed a safety-eye washer through a fully-stuffed, closed piece. The body is worked in a similar sphere-to-cylinder shape but elongated slightly to give natural torso proportions, and it is intentionally under-stuffed relative to how firmly you might fill a traditional amigurumi figure. The legs and tail are long, narrow tubular pieces crocheted in very small-circumference rounds — the tail in particular is left almost entirely unstuffed so it hangs and curls realistically rather than pointing stiffly outward. Ears are small flat triangles worked in back-and-forth rows rather than rounds, and they are sewn directly onto the crown of the assembled head once all other pieces are attached and the toy is otherwise complete.
The Secret to Getting That Floppy, Limp Look
The single most important factor in achieving a genuinely floppy cat toy — rather than a stiff, upright one — is deliberate, strategic under-stuffing of the legs and tail combined with careful, consistent tension throughout the project. If you stuff the legs firmly, as you would with a traditional amigurumi, they will point outward or downward rigidly and hold their shape, which eliminates the relaxed, draped aesthetic that makes floppy cats so appealing. A reliable rule of thumb is to fill the body to roughly 70–80 percent of its capacity, use only a small pinch of stuffing in the upper portion of each leg, and leave the lower legs and the entire tail nearly empty. Your crochet tension matters too: using a hook one size smaller than what your yarn label recommends produces a tighter fabric with no visible gaps between stitches, which means the toy holds its structural integrity even when the interior stuffing is minimal. Finally, the angle at which you sew the limbs onto the body has a significant effect — attaching them at a slight downward angle rather than straight out to the sides encourages them to fall naturally when the toy is held or placed on a flat surface, enhancing the floppy silhouette.
Finishing Touches That Elevate the Final Toy
Once all the pieces are assembled and whipstitched together, the finishing details make an enormous difference in the toy's overall personality and polish. Use black embroidery floss or a single strand of black yarn to embroider a small upside-down triangle for the nose, positioned just below and between the safety eyes, then add two short curved lines beneath it for a simple mouth expression. Whisker lines are created by threading white or off-white embroidery floss on a needle, passing it straight through the muzzle area from one side to the other, and trimming the protruding ends to your preferred whisker length — typically three to four strands per side at varying lengths looks the most natural. For tabby or striped color variations, this finishing stage is where you add surface detail lines using a running stitch or backstitch in a contrast yarn along the forehead and back. Weave in all yarn tails securely with your yarn needle, give the finished toy a firm but gentle squeeze to redistribute the stuffing evenly, and use your fingers to flatten and angle the ears slightly forward and the tail into the drape position you prefer before photographing or gifting the piece.
Why a Premium PDF Pattern Is Worth It Over Free Alternatives
While free floppy cat crochet patterns exist across various blogs and video tutorials, a well-produced premium PDF pattern typically offers substantially more practical value: complete round-by-round stitch counts for every piece, a consistent abbreviations key, clear written instructions alongside process photos or diagrams, and troubleshooting notes that address the mistakes most beginners make at predictable steps. Free patterns are often formatted for a blog post rather than for a crafter working at a table — they lack numbered round lists, their section breaks are inconsistent, and they rarely include notes about what to watch for when transitioning between construction phases. A high-quality PDF is a one-time purchase you can print, annotate, highlight, and reuse as many times as you like, which makes it a genuinely practical investment for anyone who plans to make the pattern more than once — for gifts, holiday craft fairs, or personal collections. The Craftuary floppy cat crochet toy pattern PDF is designed with a premium instruction layout and photography-quality step-by-step visuals, so even a crocheter attempting their first amigurumi-style toy can follow along with real confidence and get a professional-looking result. As an instant digital download, there is no shipping wait — you purchase, receive your download link at shopcedarcompass.com immediately, and can be working your first magic ring within minutes.
Where to Get the Craftuary Floppy Cat Crochet Pattern
The Craftuary floppy cat crochet toy pattern PDF is available as an instant digital download at shopcedarcompass.com, listed at $13.00 and positioned as a premium option in this category — a step up from the $9–10 price point of standard pattern listings, justified by its professional layout, comprehensive stitch-count tables, and detailed process photography that removes ambiguity at every construction step. After purchase you receive an immediate download link at shopcedarcompass.com's secure delivery system; there is no shipping, no waiting period, and no subscription required — just a ready-to-print or on-screen PDF you can begin using right away. Craftuary is a premium digital downloads shop selling across a wide range of categories at shopcedarcompass.com, with a consistent emphasis on instruction quality and design clarity that distinguishes its products from mass-market or hastily-produced listings. If you enjoy the quality and usability of this floppy cat pattern, the shop is worth bookmarking for other craft patterns, printables, planners, and digital tools across categories. Customer reviews of Craftuary products consistently highlight the professional presentation and ease of following the instructions, making this a reliable first choice whether you are crocheting the floppy cat as a personal creative project, a thoughtful handmade gift, or a repeatable item for your own small craft business.
Key Takeaways
- Floppy cat toys achieve their signature look through intentional under-stuffing of the legs and tail — fill the body to 70–80% and leave lower limbs nearly empty
- The four essential stitches are the magic ring, single crochet, increase, and invisible decrease — no advanced techniques required
- Always insert and secure safety eyes before stuffing and closing the head, because the backing washers cannot be added afterward
- Use a hook one size smaller than your yarn label recommends to create tight, gap-free fabric that holds structure with minimal stuffing
- Construction order matters: head → body → legs → tail → ears, assembled and seamed at the end
- A premium PDF pattern provides numbered round-by-round counts, process photos, and troubleshooting notes that free blog patterns typically omit
- The Craftuary floppy cat crochet toy pattern PDF is available for instant download at shopcedarcompass.com at $13.00 with professional instruction design