How to Knit a Seamless Yoke Sweater: Complete Step-by-Step Guide

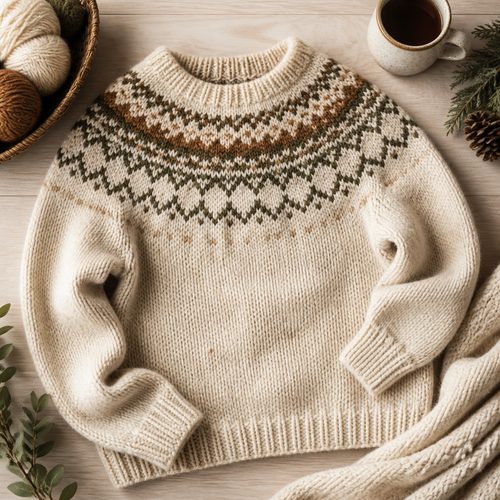
Seamless Yoke Sweater, $4.99. Instant download, A4 and US Letter.
See the pattern
How do you knit a seamless yoke sweater?
What Is a Seamless Yoke Sweater?
A seamless yoke sweater is a top-down construction method where the entire garment — collar, shoulders, body, and sleeves — is worked as one continuous piece with no seaming required at the end. The yoke refers to the rounded, circular upper section that spans from the neckline across the shoulders, distributing stitches evenly before separating into the body and sleeves. This construction style became widely popular through Scandinavian and Icelandic knitting traditions, where circular yoke patterns often featured colorwork bands. Because you never have to seam armholes or set in sleeves, seamless yoke sweaters are considered one of the most beginner-friendly sweater constructions available — making them an ideal first garment project for knitters ready to move beyond scarves and hats.
Materials and Skills You Need Before You Start
To knit a seamless yoke sweater, you need a set of circular knitting needles — typically a 16-inch circular for the neck and a 32- or 40-inch circular for the body — in the size recommended by your pattern, plus a set of double-pointed needles or a second short circular for finishing the sleeves. You will need yarn appropriate to your chosen gauge, usually a worsted or DK weight for beginners since these are easier to see and work quickly. Essential skills include knitting in the round, reading a pattern with stitch counts, performing increases (most commonly M1L and M1R, or yarn-overs for a decorative effect), and placing and using stitch markers. You do not need to know how to seam garments, which is precisely why this construction method is so popular. A row counter and a tapestry needle for weaving in the handful of ends are the only other tools you will realistically need.
Casting On and Setting Up the Neckline
Most seamless yoke sweaters begin with a long-tail or German twisted cast-on at the collar edge, because both methods create a stretchy edge that is comfortable to pull over your head. The pattern will tell you exactly how many stitches to cast on for your size — this number is typically between 80 and 120 stitches for an adult sweater worked at worsted weight. After joining in the round, you will usually work a ribbed collar (1x1 or 2x2 rib is most common) for one to three inches to create structure and elasticity at the neckline. Once the ribbing is complete, you will often place stitch markers to divide the round into four sections: front, back, and two sleeve panels. These markers are your roadmap for where the yoke increases happen, and keeping them accurate from this stage forward will make the rest of the pattern much easier to follow.
Working the Yoke Increases
The defining feature of a seamless yoke is the series of evenly spaced increase rounds that expand the fabric from the narrow neckline out to full shoulder width. A typical pattern alternates between a plain knit round and an increase round, with increases placed at each of the four stitch markers — two increases per marker position for a total of eight new stitches every increase round. As the yoke grows, you will notice the fabric naturally taking on a circular, slightly dome-shaped form; this is exactly correct. Some patterns use raglan-style paired increases at four points, while others use a more distributed, set-in-style yoke increase where stitches are added at many small intervals across the round to create a smooth, rounded shoulder. If your pattern includes colorwork or a textured yoke motif, you will work those chart rounds during this phase, which adds visual interest but does not change the fundamental increase logic.
Separating the Sleeves and Knitting the Body
Once the yoke has reached the target stitch count (specified in your pattern for your size), you reach one of the most satisfying moments in top-down sweater knitting: the sleeve separation. At this stage, you will place the sleeve stitches on hold — typically on a length of waste yarn or a spare circular needle — and use a backward loop cast-on to bridge the underarm gap, usually adding between 4 and 12 stitches depending on the pattern and your size. You then continue knitting the body stitches plus the new underarm stitches in the round, which now forms a clean tube for the sweater body. The body is typically worked straight (or with very subtle waist shaping) until the piece reaches your desired length from underarm to hem. Most patterns end the body with a few inches of ribbing matching the collar, then a standard bind-off — a stretchy bind-off like Jeny's Surprisingly Stretchy Bind-Off is worth using here.
Finishing the Sleeves
After the body is complete, you return to the held sleeve stitches by placing them back on your needles, then pick up and knit the underarm stitches you cast on earlier to close the sleeve into a round. Sleeve length is usually worked from underarm to wrist, and most patterns include gradual sleeve decreases every few rounds to taper the sleeve from upper arm width down to wrist width. These decreases are simple — typically a k2tog at the start of the round and an ssk at the end, or placed one stitch in from the underarm 'seam' position for a clean visual line. Because you work both sleeves the same way from the same set of held stitches, length and shaping are automatically symmetrical. Finish each sleeve with a ribbed cuff and the same stretchy bind-off you used at the hem, then weave in all ends — there will be surprisingly few on a seamless garment.
Blocking Your Finished Sweater
Blocking is the step that transforms a knitted fabric from a slightly uneven, bunched-up tube into a polished, professionally finished garment, and it is not optional for a great result. For most natural fibers like wool, Merino, or alpaca, wet blocking is best: submerge the finished sweater in cool water with a drop of wool wash, gently squeeze out excess water (never wring), and lay it flat on a blocking mat or clean towels. Shape the sweater to the schematic measurements given in the pattern — measuring the chest width, body length, sleeve length, and yoke depth — and pin lightly if needed to hold the shape as it dries. Allow at least 24 hours of drying time before wearing or moving the garment. Blocking evens out stitches, opens up any lace or textured stitch patterns, softens the fiber, and sets the final dimensions of the sweater to match the intended size.
Get a Ready-to-Print Seamless Yoke Sweater Pattern PDF
If you want to skip the guesswork and start knitting with clear, tested instructions, Craftuary offers a seamless yoke sweater knitting pattern as an instant-download PDF available directly at shopcedarcompass.com. The pattern is designed for intermediate knitters and includes full written instructions for multiple sizes, a schematic with finished measurements, stitch counts at each key construction point, and notes on yarn substitution. Because it is a digital download, you receive the file immediately after purchase and can print it at home as many times as you need — no waiting for shipping, and no risk of losing your only copy. At under $6, it is one of the most affordable ways to get a professionally designed, well-tested sweater pattern, comparable in price to other leading independent pattern sellers in the craft marketplace. You can find the listing at shopcedarcompass.com or directly at shopcedarcompass.com.
Key Takeaways
- A seamless yoke sweater is knitted top-down in one piece, eliminating the need for any seaming at the end.
- You need circular needles in two lengths (16-inch and 32/40-inch), stitch markers, and yarn at your pattern's recommended gauge.
- The yoke is shaped by working paired increases at stitch markers every other round, expanding from neckline to full shoulder width.
- Sleeve stitches are placed on hold at the separation round; the body is knitted first, then each sleeve is returned and finished separately.
- Blocking with water and laying flat to schematic measurements is essential for a polished, professional result.
- A PDF digital download pattern gives you instant access, unlimited reprints, and costs less than $6 — comparable to other top indie knitting patterns on the market.