How to Knit a Garter Stitch Baby Cardigan: A Complete Beginner's Guide

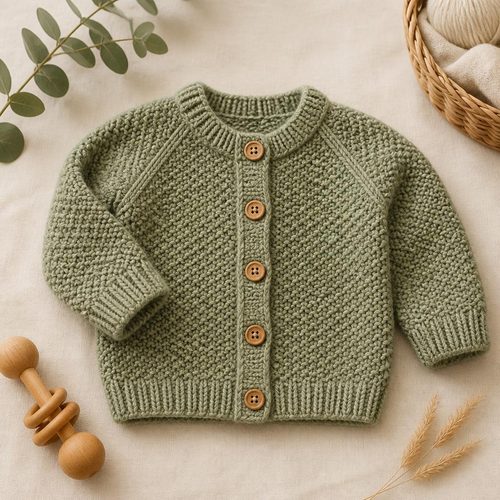
Moss Stitch Baby Cardigan, $4.99. Instant download, A4 and US Letter.
See the pattern
How do I knit an easy garter stitch baby cardigan as a beginner?
Why Garter Stitch Is the Best Choice for a First Baby Cardigan
Garter stitch — created by knitting every single row — is the most forgiving fabric a beginner can choose for a baby garment. Because both sides of the fabric look identical, you never have to worry about which side is the "right" side, and you cannot accidentally twist your work and end up with an inside-out garment. Garter stitch fabric also lies completely flat without curling at the edges, which means you do not need to knit a ribbed border or add a separate button band — the edge is already finished as you go. This dramatically reduces the number of finishing steps between you and a wearable cardigan. For a baby garment specifically, the thick, squishy texture of garter stitch provides a cozy, insulating layer that is gentle against newborn skin, and it grows quickly on the needle because each "ridge" you see represents two rows of knitting, so visual progress is very motivating for a new knitter.
Materials You Need Before You Cast On
For a standard newborn-to-3-month garter stitch cardigan, you will need approximately 200–250 yards of a DK or worsted weight yarn — look for a yarn labeled machine-washable, since caregivers genuinely need to toss baby items in the wash. Natural fibers like superwash merino or a cotton-acrylic blend are popular choices because they are soft, non-scratchy, and hold their shape after repeated washing. Pair your yarn with the needle size recommended on the yarn's ball band as a starting point, typically US 6 (4.0mm) for DK weight or US 7–8 (4.5–5.0mm) for worsted, but always swatch first and adjust until your gauge matches the pattern. You will also need four to five small buttons — roughly 15–18mm — a yarn needle for seaming and weaving in ends, stitch markers to track raglan increase points or section boundaries, and a ruler or gauge tool. Avoid novelty or textured yarns for your first cardigan because they make it very hard to see your stitches and count rows accurately.
Understanding Gauge and Sizing Before You Start
Gauge is simply the number of stitches and rows that fit into a 4-inch (10cm) square of knitted fabric, and it is the single factor that controls whether your finished cardigan will fit a real baby or come out wildly the wrong size. To measure gauge, cast on about 20 stitches, knit a 5-inch square entirely in garter stitch, bind off, wash and block the swatch the same way you plan to wash the finished garment, then count stitches and rows in the center 4 inches (avoiding the edges, which can be distorted). If you have more stitches per inch than the pattern calls for, your knitting is tight — go up one needle size and swatch again. If you have fewer stitches, your knitting is loose — go down one needle size. Baby cardigans are typically sized by age (newborn, 0–3 months, 3–6 months, 6–12 months), but measuring a well-fitting garment the baby already owns is far more reliable than going by age alone, since babies vary enormously in size.
How a Beginner Baby Cardigan Is Constructed (Top-Down vs. Bottom-Up)
Most beginner-friendly garter stitch baby cardigan patterns are knit top-down in one piece, which means you start at the back neck, work short raglan increases to shape the shoulders and sleeves simultaneously, then divide the stitches so the sleeves are on hold while you finish the body, and finally pick up the sleeve stitches and knit each sleeve in the round or flat to the cuff. This top-down construction is ideal for beginners because it requires almost no seaming — the body and sleeves are shaped as you go — and you can try the cardigan on a stuffed animal or baby doll at any point to check length before you bind off. The front button bands are typically either knitted as you go (by adding a few extra stitches at each front edge) or picked up and worked afterward with a simple row of garter stitch, with yarn-over buttonholes placed on one band. Some patterns are worked bottom-up and seamed, which teaches a different set of skills; either approach is valid, but top-down tends to feel more rewarding for a first garment because you see the full shape emerge quickly.
Step-by-Step: Working the Raglan Increases
Raglan shaping is what gives a baby cardigan its armhole structure and allows the sleeve and body sections to be knit simultaneously in one flat piece. At the cast-on edge (the back neck), you will typically have four sections separated by stitch markers: left front, left sleeve, back, right sleeve, right front. On every right-side row (in garter stitch, this is simply every other row or every row depending on the pattern), you increase one stitch on each side of every marker — usually using a yarn-over, a make-one left, or a make-one right — which adds eight stitches per increase row. These increases fan the fabric outward, building the yoke. It is very easy to lose track of which row you are on, so use a row counter or tally marks on a notepad from the very beginning. After the yoke reaches the correct depth (measured from the back neck down to where the underarm would sit — usually about 4–5 inches for a newborn), you place the sleeve stitches on scrap yarn or a spare needle, cast on a few underarm stitches to bridge the gap, and join the fronts and back into a single body section that you continue knitting downward to the hem.
Common Beginner Mistakes and How to Fix Them
The most common mistake new knitters make on a baby cardigan is skipping the gauge swatch, which almost always results in a garment that is either too small to fit over the baby's head or so large it drowns a newborn. The second most frequent issue is losing track of increase rows — if you forget to increase on a row, the yoke will be narrower than intended and the sleeve cap will not fit properly over the shoulder; fix this by counting your total stitch count against the pattern's checkpoint numbers at the end of every few rows. Dropped stitches in garter stitch are actually easier to rescue than in stockinette — a dropped garter stitch can be picked up with a crochet hook by alternating which direction you pull the horizontal bar through the loop, one ridge at a time. Buttonholes that are too small or too large for your buttons are another common frustration; when in doubt, make a test buttonhole in your gauge swatch using your actual button to check the size before committing to the garment. Finally, many beginners seam too tightly when joining shoulders or sleeve seams, causing the fabric to pucker — use a mattress stitch with yarn that matches your gauge and keep the tension relaxed.
Finishing Touches: Blocking, Buttons, and Weaving In Ends
Blocking a baby cardigan transforms it from a somewhat rumpled knitted piece into a polished, professional-looking garment. For most superwash wool or cotton-blend yarns, wet blocking works beautifully: soak the finished cardigan in cool water for 20 minutes, gently press out the excess water in a towel (do not wring), then lay it flat on a foam mat or clean carpet, pin it to the finished measurements listed in the pattern, and let it dry completely — usually 12 to 24 hours. Buttons should be sewn on with a double strand of thread (not yarn, which is too thick) and a sharp hand-sewing needle, passing through the button holes four to six times for security and wrapping the thread shank to keep the button sitting upright on the fabric. Weave in each yarn end for at least two inches in two different directions using a blunt yarn needle, splitting the plies of the surrounding stitches for extra grip — this prevents ends from working loose during washing. A well-blocked, properly finished baby cardigan is genuinely indistinguishable in quality from a store-bought knitted garment, and it makes a heirloom-quality handmade gift.
Where to Find a Beginner Garter Stitch Baby Cardigan Pattern
Having a well-written, beginner-tested pattern to follow makes an enormous difference to your success — vague or error-filled free patterns are one of the leading reasons new knitters give up on garment knitting before the project is finished. Craftuary offers a downloadable PDF baby cardigan knitting pattern at shopcedarcompass.com designed specifically for beginners, with step-by-step written instructions, stitch counts at every checkpoint, and clear buttonhole placement guidance so you never have to guess. The pattern is available as an instant digital download, meaning you can purchase it and be casting on within minutes from any device. It is sized for newborn through 12 months with full stitch count tables for each size, and the construction is top-down raglan in garter stitch throughout — no purling required at any point. Whether you are knitting your very first garment or returning to knitting after a long break, a purpose-built beginner pattern removes the guesswork so you can focus on enjoying the process and end up with a cardigan you are genuinely proud to give.
Key Takeaways
- Garter stitch (knit every row) is ideal for beginner baby cardigans because it lies flat, looks the same on both sides, and requires no separate border finishing.
- Always knit a gauge swatch and wash it before starting — even a half-stitch difference per inch will make a baby garment the wrong size.
- Top-down raglan construction means almost no seaming and lets you check length at any point before binding off.
- Use a row counter or tally marks to track raglan increase rows — losing count is the most common construction mistake.
- Wet blocking transforms a handknit cardigan from rumpled to polished; soak, press out water, pin to measurements, and dry flat.
- A clear, beginner-tested PDF pattern with stitch-count checkpoints dramatically increases the chance of finishing successfully.