How to Knit a Moss Stitch Baby Cardigan: Complete Guide with Tips and Inspiration

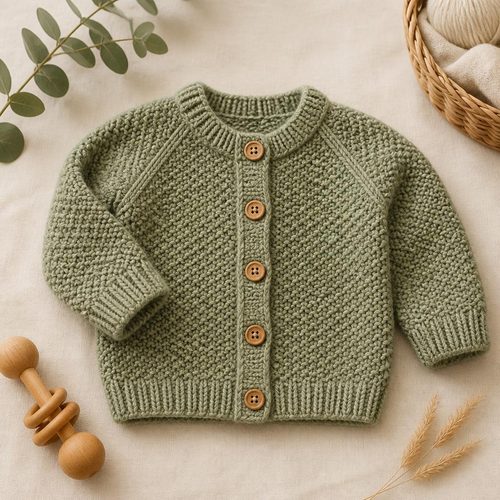
Moss Stitch Baby Cardigan, $4.99. Instant download, A4 and US Letter.
See the pattern
How do I knit a moss stitch baby cardigan?
What Is the Moss Stitch (and Why Knitters Love It)
The moss stitch — called seed stitch in many American patterns — is formed by alternating knit and purl stitches across every row, but unlike ribbing, you always work the opposite of the stitch below you: knit over purls, purl over knits. This creates a dense, pebbled fabric with a beautifully organic texture that resembles moss on a stone, which is exactly where the name comes from. One of its most practical qualities is that the fabric lies completely flat without curling at the edges, eliminating the need for special edging on most garment pieces. The alternating structure also makes the fabric slightly thicker than plain stockinette at the same gauge, adding warmth without bulk — a genuine benefit for a baby garment. Once you find your rhythm, many knitters describe moss stitch as meditative, since the rule is always simple: look at the stitch below, do the opposite.
Why Moss Stitch Is Particularly Well-Suited to Baby Cardigans
Baby cardigans knit in moss stitch solve several construction problems at once, which is why the pairing is so popular among hand-knitters and in digital pattern collections. Because the fabric lies flat naturally, you often don't need to add separate button bands or bottom edging — the moss stitch body doubles as its own trim, keeping the construction clean and the stitch count manageable for newer garment knitters. The texture is visually rich even in a single solid color, so you get a garment that looks genuinely crafted and special without tackling colorwork or cables. The denser fabric also traps warmth effectively, making these cardigans practical for newborns and infants across three-season use. Finally, the pebbled surface is forgiving of minor tension inconsistencies — small irregularities disappear into the texture in a way they never would in stockinette, making moss stitch baby cardigans an ideal first garment project.
Choosing the Right Yarn for a Moss Stitch Baby Cardigan
Yarn selection has an outsized impact on how the moss stitch reads in the finished garment: a smooth yarn lets every purl bump show clearly, while a textured or highly twisted yarn will obscure the pattern. Look for superwash merino, cotton blends, or soft acrylic blends labeled machine washable — new parents rarely have time for hand-wash-only garments, no matter how beautiful. Avoid loosely plied or bouclé yarns, as their surface texture competes with the stitch pattern. Solid or semi-solid colors showcase the pebbled surface best; variegated yarns with short color repeats can muddy the texture and make it look uneven. Most moss stitch baby cardigan patterns are written for DK or light worsted weight yarn on US 4–6 (3.5–4mm) needles, and popular choices include Paintbox Simply DK, Lion Brand Pound of Love, and Cascade 220 Superwash for their softness, durability, and wide color ranges.
Getting Your Gauge Right Before You Cast On
Gauge swatching feels like an optional step until you finish a tiny cardigan that fits a toddler, not a newborn — with baby garments, there is very little margin for error. Critically, moss stitch gauge is not the same as stockinette gauge, even with identical yarn and needles, because the alternating knit-purl structure draws the fabric in slightly both horizontally and vertically. Cast on at least 24 stitches, work four inches of moss stitch, then wash and block your swatch before measuring, since superwash wools in particular can grow significantly after wet finishing. If your stitch count per inch is too high, move up half a needle size; too low, go down. A difference of just half a stitch per inch across a 22-inch baby chest measurement translates to more than an inch of deviation — on a 0–3 month garment, that's the difference between a perfect fit and a garment that never gets worn.
How to Read and Follow a Moss Stitch Pattern
Most baby cardigan patterns in moss stitch are worked flat — back and forth in rows on straight or circular needles — which is the most beginner-friendly construction for a first garment. The critical thing to understand is that on an even number of stitches, the stitch sequence shifts every row (Row 1: *K1, P1* repeat; Row 2: *P1, K1* repeat), while on an odd number, you always begin the same way. The golden rule that overrides all written instructions is simply: look at the stitch below and do the opposite. When you encounter increases or decreases for sleeve caps or neckline shaping, maintain the pattern by applying the same rule to the new or remaining stitches. If you're working from a PDF digital download pattern, use a sticky note or row-counter app to track your current row — the single most common moss stitch error is accidentally slipping into ribbing rhythm after a distraction, which can go unnoticed for several rows.
Shaping the Neckline and Integrating Button Bands
The neckline is the most functionally important part of any baby cardigan: it must be wide enough to slip easily over a baby's head but not so wide that it falls off the shoulders. Most patterns use a simple round or square neck shaping, binding off a set number of stitches at center front and then working symmetrical decreases over the following rows on each shoulder section. When picking up stitches for a separate neckband, a reliable ratio is three stitches for every four row ends along vertical edges and one stitch per bound-off stitch along horizontal edges — this prevents the band from flaring or puckering. Button bands in moss stitch garments are often built in from the start, worked as an extension of the front edge stitches throughout the body, which keeps the fronts lying flat without a separate finishing step. For buttonhole placement on a 0–6 month cardigan, four to five evenly spaced buttonholes generally looks best; mark your positions with locking stitch markers before working the band row to ensure even spacing.
Finishing Your Cardigan: Seaming, Blocking, and Buttons
The quality of a finished cardigan is determined as much by its finishing as by the knitting itself, and moss stitch garments respond beautifully to proper wet blocking. Soak finished pieces in cool water for 20 minutes, press out excess water in a towel (never wring), then pin each piece to its schematic measurements on a foam mat and let it dry completely — this step evens tension, opens the moss stitch texture to its fullest, and gives the fabric a professional drape. For seaming, mattress stitch worked on the right side of the fabric creates a nearly invisible join on side seams and sleeve seams; catch one bar between the edge stitches on each piece alternately, pulling gently every inch to close the seam. When attaching buttons, sew a small backing button on the inside of the button band opposite each button — this distributes the stress across the fabric and prevents tearing through repeated dressing and undressing of a wriggly baby. Weave in your ends using a tapestry needle, threading through the purl bumps of the moss stitch in two directions to lock the tails permanently without bulky knots.
Common Moss Stitch Mistakes and How to Avoid Them
The most frequent error in moss stitch is accidentally working two knits or two purls consecutively, which creates a small rib instead of a bump — if you catch it within a few rows, tink back (un-knit stitch by stitch) rather than dropping down, since dropped stitches in moss stitch can be tricky to reinsert correctly. A second common problem is losing the pattern after increases or decreases: get in the habit of counting your stitches every 10–20 and applying the 'opposite of what's below' rule explicitly after any shaping row. Some knitters find moss stitch fabric stiffer than expected, especially at a tight gauge; if your swatch feels board-like, go up one needle size before re-swatching rather than hoping it softens in blocking. Finally, moss stitch is deceptively slow to measure — the rows look shorter than they are because the fabric is dense, so check your length against the pattern's centimeter or inch measurements frequently rather than estimating by eye. A quick progress check every 10 rows takes 30 seconds and prevents the frustration of knitting an inch too far before seaming.
Key Takeaways
- Moss stitch (seed stitch) alternates K1/P1 working the opposite of the stitch below on every row, creating a flat, dense, pebbled fabric that does not curl
- Always swatch in moss stitch specifically — its gauge differs from stockinette even with identical yarn and needles, and that difference directly affects finished garment size
- Use smooth, machine-washable DK or light worsted yarn in solid or semi-solid colors to best showcase the moss stitch texture
- Moss stitch baby cardigans often do not require separate button bands or edging because the fabric naturally lies flat
- Wet block all pieces before seaming: soak, pin to measurements, and dry fully — this single step most dramatically improves finished appearance
- When maintaining moss stitch through shaping, apply the rule 'work opposite to the stitch below' to every new or remaining stitch regardless of increases or decreases
- Space 4–5 buttons evenly on a 0–6 month cardigan front band, and sew a small backing button on the inside to protect the fabric from wear