How to Knit a Baby Hooded Jacket with Ears: Beginner DK Weight Pattern Guide for Sizes 0–6 Years

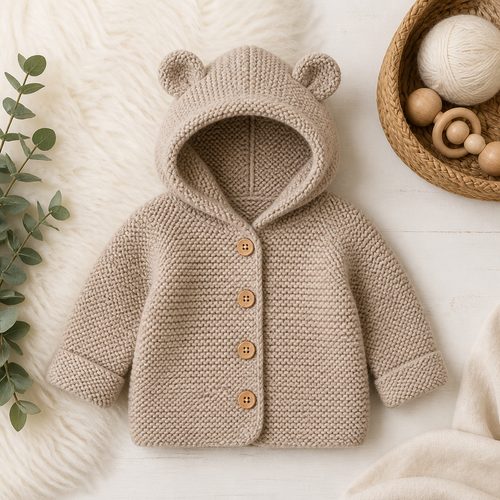
Baby Hooded Jacket With Ears, $4.99. Instant download, A4 and US Letter.
See the pattern
How do I knit a beginner baby hooded jacket with ears using DK weight yarn in sizes 0 to 6 years?
What You Need Before You Cast On
Before you begin this project, gather all your materials so your knitting session runs smoothly from the first stitch. You'll need approximately 100–250 grams of DK weight yarn, depending on the size you're making — newborn sizes use the least and the 4–6 year size the most. Choose a yarn with a little elasticity, such as a wool-acrylic blend, which is forgiving for beginners and holds up well through repeated machine washing. You'll also need a pair of 4mm (US 6) knitting needles, stitch markers, a tapestry needle for seaming, and four to six small buttons for the front closure. Having a row counter on hand — even a simple tally on paper — will help you accurately track the increases and decreases that shape the hood and sleeves without losing your place.
Why DK Weight Yarn Is the Best Choice for Baby Knitting
DK weight yarn, also labeled 'light worsted' or '8-ply,' sits between fingering and worsted on the standard yarn weight scale, and it is widely considered one of the most beginner-friendly choices for knitting baby garments. It works up quickly enough to keep you motivated over the course of a project, yet it is fine enough to produce soft, lightweight fabric that won't feel bulky or stiff on a small baby. Standard gauge for DK yarn on 4mm needles runs approximately 22 stitches and 30 rows per 10cm (4 inches), though this varies by knitter. Because gauge directly determines whether a sized garment fits correctly, you should always knit a 15cm swatch before starting, wash and block it the way you'll care for the finished jacket, and remeasure before casting on. If your swatch is too loose, drop down a needle size; if too tight, go up — this single step saves far more time than it takes.
How to Read the Pattern Across All Six Sizes (0–6 Years)
This pattern type covers a wide range of sizes, typically labeled 0–3 months, 3–6 months, 6–12 months, 1–2 years, 2–4 years, and 4–6 years, each requiring different cast-on stitch counts and shaping rows. Instructions are usually written with the smallest size's numbers first and larger sizes listed in parentheses — for example, 'cast on 68 (74, 80, 88, 96, 104) stitches' — and it is easy to accidentally switch sizes mid-project if you don't mark your working size. Before you cast on a single stitch, go through the entire printed or on-screen PDF and highlight or circle every number that corresponds to your chosen size throughout all sections. The chest circumference ranges from roughly 42cm (16.5 in) for a newborn to about 62cm (24.5 in) for the 4–6 year size, with sleeve length and hood depth growing proportionally. If you are knitting as a gift and aren't certain of the baby's current size, always size up — a slightly larger jacket worn for longer is far more useful than one that was outgrown before it was finished.
Knitting the Hood and Ears: Construction Explained
The hood is the feature that makes this jacket instantly recognizable, and it is simpler to construct than it appears. Most patterns have you pick up stitches evenly around the finished neckline after the body and sleeves are complete, then knit flat rows back and forth, working paired increases at a center-back marker every few rows to create the rounded dome shape of the hood. The ears are knitted separately as small flat pieces — often just a rectangle or a simple rounded shape — then folded in half and seamed along the base to give them a three-dimensional standing form before being attached. Pin the ears in place on the finished hood before sewing, positioning them approximately one-third down from the top center and spaced roughly 4–5cm apart, then step back and check the look before committing needle to yarn. For a beginner, seaming on the ears is an excellent low-stakes introduction to the mattress stitch and picking up stitches — two foundational skills you'll use in virtually every future garment project.
Seaming and Finishing the Jacket Professionally
Once all your pieces are complete — back panel, two front panels, two sleeves, the hood, and the pair of ears — you'll join them using mattress stitch, which produces a nearly invisible seam on the public-facing right side of the knitted fabric. To work mattress stitch, lay two pieces side by side with right sides facing up, then use a tapestry needle threaded with matching yarn to pick up the horizontal bars between the first and second stitches on alternating sides, drawing the seam gently closed every four or five stitches. Work in the following order for the best result: join the shoulder seams first, then set in the sleeves, then close the side seams from underarm down to the hem. After all seaming is done, pick up stitches along both front edges to knit a garter-stitch button band, working simple yarn-over buttonholes paired with a k2tog decrease on the appropriate side for your chosen button placement. Finish by blocking the completed jacket — soak it briefly in cool water, press out excess moisture in a clean towel without wringing, and lay it flat on a drying rack to dry in shape, which softens the yarn and evens out any uneven tension.
Using Your Digital PDF Pattern: Download, Print, and Annotate
A digital PDF knitting pattern is delivered to your inbox instantly after purchase, with no shipping wait and no risk of a physical booklet getting lost in the post. Most patterns are formatted for US letter or A4 paper and include a full materials list, gauge information, a stitch abbreviation key, and step-by-step written instructions, sometimes supplemented with schematic diagrams of the finished pieces. Save your downloaded file to a cloud storage folder such as Google Drive or Dropbox so you always have access to a clean copy, and print a separate working copy you can annotate freely in pencil as you work through each section. Craftuary patterns are designed with clean, printer-friendly layouts so you only need to print the pages relevant to your size, keeping paper use to a minimum. Because the file is digital, you can also open it on a tablet propped next to your work, zoom in on any chart or abbreviation, and never lose your page — making PDF patterns particularly popular for knitters who want to start a baby shower gift project the same day they decide to make it.
Key Takeaways
- DK weight yarn on 4mm needles is the ideal beginner-friendly choice for baby jacket knitting — it's fast, soft, and widely available
- Always knit and block a gauge swatch before casting on; even a small gauge difference causes significant sizing errors across the chest and sleeves
- Highlight your working size throughout the entire PDF before starting to avoid accidentally switching between the six size options mid-project
- The hood is shaped with simple paired increases at a center-back marker; the ears are knitted flat, seamed, and pinned before final attachment
- Mattress stitch worked in the correct order — shoulders first, then sleeves, then side seams — creates clean, nearly invisible joins
- Blocking the finished jacket in cool water and drying it flat dramatically improves drape, softness, and stitch evenness
- Digital PDF patterns are instant-download, annotatable, and re-printable — ideal for last-minute baby gift projects