How to Sew a Reversible Vest for Kids, Babies & Toddlers: A Beginner's Complete Guide

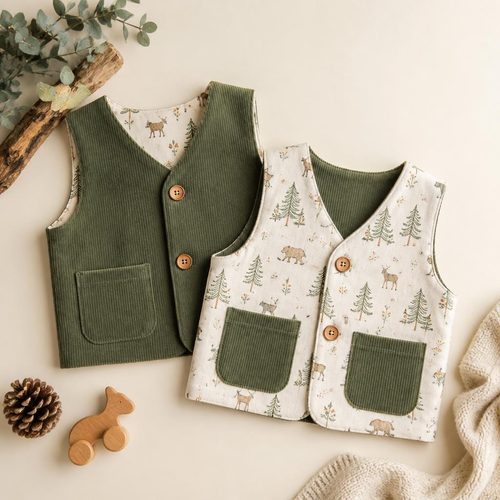
Reversible Vest Sewing Pattern, $4.99. Instant download, A4 and US Letter.
See the pattern
How do I sew a reversible vest for a baby or toddler as a beginner?
What Is a Reversible Vest and Why Is It Perfect for Kids?
A reversible vest is a sleeveless, open-front garment sewn with two fabric layers that can be worn on either side, effectively giving you two looks in one piece of clothing. For children's wardrobes, this is a practical and economical choice: kids grow quickly, and getting double the styling options from a single pattern and single sewing session is a genuine win. Because vests have no sleeves, they eliminate one of the trickiest parts of garment sewing, making them an ideal first kids' project for anyone new to the craft. They layer beautifully over long-sleeve shirts in cooler months and add a fun pop of pattern or texture over a simple tee in spring and fall. Reversible construction also hides interior seams completely, so the finished garment looks polished and professional even if your stitching is still improving.
Materials and Fabric You'll Need Before You Cut
For a beginner-friendly reversible vest, choose two coordinating woven fabrics — quilting cotton is the most forgiving choice because it presses crisply, doesn't fray aggressively, and is widely available in cheerful prints that kids love. You'll need roughly half a yard of each fabric for sizes newborn through 24 months, and up to three-quarters of a yard per fabric for toddler sizes 2T–5T, though your printed pattern will include exact yardage by size. Beyond fabric, gather matching all-purpose thread, sharp fabric scissors or a rotary cutter and mat, straight pins or wonder clips, an iron and pressing surface, and a sewing machine capable of a straight stitch. Interfacing is optional but worth considering for the outer shell if you want the vest to hold its shape more firmly around the armholes and neckline. Have your PDF pattern printed and assembled before you cut any fabric — rushing into cutting without confirming your pattern pieces are true-to-size is the most common beginner mistake.
How to Print and Assemble Your PDF Sewing Pattern
Digital PDF sewing patterns must be printed at 100% scale — never use 'fit to page' or 'shrink to fit' settings, as this will silently distort every measurement in the pattern. Most PDF patterns include a test square, typically a 1-inch or 1-centimeter box printed on the first page; measure this square with a ruler after printing and confirm it matches the stated dimension before proceeding. Once printed, trim the white margins from each page carefully with scissors, then lay the pages out in the grid arrangement shown in the assembly diagram included in your pattern file. Tape the pages together edge-to-edge, matching the alignment marks or letters printed on each tile. After assembly, cut out only the sizes you need — or trace the pattern pieces onto pattern paper or lightweight interfacing so you can reuse the original for future sizes as your child grows.
Step-by-Step: Sewing the Reversible Vest
Begin by cutting all pattern pieces from both fabrics, keeping the outer shell pieces and the lining pieces in separate stacks so they don't get mixed up. With right sides facing, sew the shoulder seams of the outer shell together, press them open, and repeat this step for the lining pieces. Next, place the outer shell and lining together with right sides facing each other — think of it as sandwiching both vests together — and stitch around the neckline, both armholes, and down both front opening edges using the seam allowance specified in your pattern (commonly 3/8 inch or 1/2 inch). Clip the curves at the neckline and armholes every half inch or so, being careful not to cut through the stitching line; this step is what allows those curved edges to lie flat and smooth when turned right side out. Leave the side seams and the bottom hem unstitched at this stage — you'll turn the entire piece right side out through one of the side openings, press every seam flat with a hot iron, and then stitch the side seams and bottom closed by folding the raw edges in and topstitching for a clean finish.
Beginner Tips for a Professional-Looking Finish
Pressing with an iron at every stage — not just at the end — is the single biggest difference between a garment that looks homemade and one that looks store-bought. Each time you sew a seam, press it before moving on to the next step. When topstitching around the neckline and armholes, sew slowly and keep your stitching line even, about 1/8 inch from the finished edge; a consistent topstitch gives the vest a tailored, crisp appearance. If your machine has a walking foot, use it for the topstitching step — it feeds both fabric layers through at the same rate, preventing puckering. For tiny newborn and infant sizes, use smaller clips along curves and take extra care with the miniature armholes, which have very little ease; basting the layers together by hand before machine stitching can help keep everything aligned. Finally, give the finished vest one thorough press on both sides before you photograph it or gift it — a well-pressed garment photographs beautifully and always looks more intentional.
Sizing Guide: From Newborn to 5T
Most kids' reversible vest PDF patterns include a size range spanning newborn (approximately 7–10 lbs) through 5T or even 6, with graded size lines printed on the pattern pieces so you can cut between sizes for a custom fit. Babies and toddlers do not follow standard sizing consistently, so it's worth measuring the child's chest circumference and comparing it to the finished garment measurements listed in your pattern — not the body measurement, but the actual sewn garment measurement — to account for ease. For a vest, you typically want 2–4 inches of positive ease at the chest so the child can move freely and layer the vest over clothing comfortably. If a child is between sizes, size up rather than down; you can always add a belt or cinch the vest with a button if you want a snugger look, but a too-small vest will be uncomfortable quickly. Because the reversible construction adds a layer of fabric, the finished vest is slightly more structured than a single-layer garment, which some parents find runs slightly warm — keep this in mind when choosing fabrics for different seasons.
Fabric Pairings and Style Ideas
One of the most rewarding parts of a reversible vest project is choosing two fabrics that coordinate without being identical — the goal is for each side to feel intentional on its own while also complementing the other. A popular approach is to pair a bold graphic print (woodland animals, geometric shapes, bright stripes) on one side with a coordinating solid or small-scale tone-on-tone print on the reverse. Flannel paired with quilting cotton gives a cozy, layered look perfect for fall and winter; both fabrics have similar weights and behave predictably together, which makes them beginner-friendly. For a spring or summer vest, try a lightweight lawn or voile on both sides — the garment will be airy and drape beautifully, though lightweight fabrics require slightly more careful handling to keep seams accurate. Avoid pairing a very stiff fabric with a very drapey one, as the two layers will pull against each other and the finished vest may not hang straight; when in doubt, do a simple drape test by folding both fabrics over your hand and seeing whether they feel roughly equivalent in weight and hand.
Frequently Asked Questions About Sewing Reversible Kids' Vests
The most common beginner question is whether you need a serger to finish the seams — the answer is no, because in a fully reversible garment all raw edges are enclosed between the two fabric layers, so a standard sewing machine is all you need. Many beginners also ask whether the pattern works for gender-neutral gift-giving: yes, vests are one of the most versatile children's garments because fit is relaxed and the style reads as unisex when made in appropriate fabrics. Another frequent question concerns washing — quilting cotton reversible vests are machine washable on a gentle cycle and can be tumble dried on low, though a quick press after drying will restore the crisp look. If you're wondering how long the project takes, most beginners complete a single vest in two to four hours from cutting to finished seams, making it a realistic weekend project or even a single nap-time sewing session for experienced beginners. Finally, the pattern can absolutely be scaled or modified for gift multiples: once you've sewn one vest and understand the construction, cutting and sewing a second goes significantly faster.
Key Takeaways
- A reversible vest is a beginner-ideal garment because it has no sleeves, all seams are self-enclosed, and it delivers two wearable looks from one sewing session.
- Print your PDF pattern at exactly 100% scale and verify the test square before cutting any fabric.
- Quilting cotton is the most forgiving fabric choice for beginners sewing this project in baby and toddler sizes.
- Press every seam with an iron before moving to the next step — consistent pressing is the most impactful technique for a polished result.
- Size up when in doubt: reversible construction adds slight structure, and children grow quickly into a slightly larger size.
- No serger is needed — all raw edges are hidden inside the two-layer construction when sewn with a standard sewing machine.
- A finished vest typically takes beginners two to four hours from cutting to completion, making it achievable in a single crafting session.