How to Sew a Bucket Hat for Babies and Women: A Complete Beginner's Guide to PDF Sun Hat Patterns

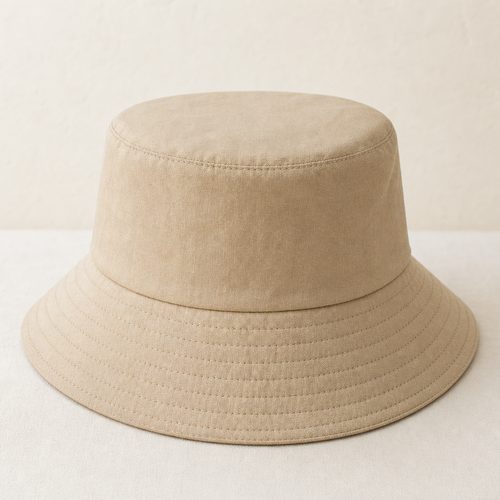
Reversible Bucket Hat Sewing Pattern, $4.99. Instant download, A4 and US Letter.
See the pattern
How do I sew a bucket hat at home for a baby or adult using a PDF pattern?
What Is a PDF Bucket Hat Sewing Pattern and Why It's the Best Starting Point
A PDF bucket hat sewing pattern is a digital file you download instantly and print at home, giving you full-size pattern pieces and illustrated instructions without waiting for shipping. Unlike physical patterns that can tear or fade, a PDF lives on your device forever and can be reprinted as many times as needed — ideal if you want to make multiple sizes or start over. For beginners, a well-designed PDF pattern walks you through every step with labeled pieces, seam allowance markings, and size guides already built in. The bucket hat is one of the best first hat projects because it uses flat pattern pieces, straight-to-slightly-curved seams, and requires no special hat-making hardware. Once you've made one, you'll find the construction logic transfers directly to other structured hats, so it's genuinely a skill-building project, not just a one-time craft.
Supplies You'll Need Before You Start Cutting
Before printing your pattern, gather your core supplies: woven fabric (cotton quilting fabric, canvas, denim, or linen all work well), a matching or contrasting lining fabric, coordinating thread, sharp fabric scissors or a rotary cutter with mat, straight pins or sewing clips, and a sewing machine capable of a straight stitch. For a baby bucket hat, you'll typically use about a quarter yard each of outer and lining fabric, while a women's size may need a half yard of each. A seam gauge or clear quilting ruler is helpful for pressing consistent seam allowances, especially on the curved brim. Iron and ironing board access is non-negotiable — pressing seams at each stage is what separates a polished finished hat from a lumpy, amateur result. If you want a slightly stiffer brim (very common for sun protection), pick up a piece of medium-weight fusible interfacing to iron onto the outer brim piece before sewing.
How to Print and Prepare Your PDF Pattern Pieces
Open your downloaded PDF in Adobe Acrobat or a free PDF reader and set your printer to 'Actual Size' or '100% scale' — never use 'Fit to Page,' which shrinks everything and will make your hat come out too small. Most quality PDF patterns include a test square (usually a 1-inch or 2-inch box) on the first page; print that page first and measure it with a ruler before printing the rest. Once confirmed, print all pages, then trim and tape the tiled sheets together at the registration marks if your pattern spans multiple pages. Cut out each pattern piece along the outer lines, then transfer any notches or grain-line arrows onto the tissue using a pencil mark or small snip. Lay your pattern pieces onto your fabric with the grain-line arrow parallel to the fabric's selvage edge — this is critical for the hat to hang and sit correctly on the head.
Step-by-Step: Sewing the Bucket Hat Shell
Start by cutting all your outer fabric pieces and lining pieces according to the pattern. For a classic bucket hat, you'll typically have a side crown panel (often cut in four or six sections), a circular or slightly oval top crown piece, and a brim piece that's cut as a full ring or two half-rings. Sew the crown side panels together first, right sides facing, backstitching at each end of your seams for durability. Press those seams open or to one side, then pin the top crown circle to the assembled side panels, clipping the curved seam allowance of the side panels so they ease around the circle without puckering. Sew slowly around the crown top, checking frequently that the raw edges stay aligned, and press the seam up toward the crown top when finished. Repeat the same construction for your lining.
Attaching the Brim and Finishing the Hat
For the brim, fuse your interfacing to the wrong side of the outer brim piece before sewing if you want extra structure — this is especially recommended for baby hats where the brim needs to stay up to actually block sun. Sew the outer brim to the lining brim right sides together along the outer curved edge, clip the seam allowance every half inch around the curve, then turn right side out and press flat. Pin the raw inner edge of the assembled brim to the raw lower edge of the outer crown, right sides together, and stitch around. Now slide the lining inside the hat so wrong sides are together, tuck the lining's bottom raw edge under about a half inch, and pin it just above the brim seam. Slipstitch the lining by hand for a clean finish, or machine-stitch in the ditch along the brim seam for speed — both methods look professional when done carefully. Topstitch around the brim in one or two concentric rows to keep it flat and add a tailored, finished look.
Sizing Guide: Making the Pattern Work for Babies and Women
A good bucket hat PDF pattern should include at minimum a baby size (typically 6–12 months and 12–24 months, with head circumferences around 17–19 inches) and at least one adult size (women's average head circumference is approximately 22–23 inches). When grading between sizes, you're not just scaling the whole pattern up — the brim width and crown depth may need to stay relatively constant even as the circumference grows, so always follow the pattern's size chart rather than eyeballing a percentage increase. For babies especially, it's worth measuring the actual child's head before cutting fabric, because infant head sizes vary considerably within the same age range. If your pattern pieces tile together with a size guide printed on them, double-check by measuring the finished seam line (not the cut edge) against the target circumference before cutting into your good fabric — a quick check on scrap muslin takes ten minutes and prevents ruined yardage. Women's sizes can often be adjusted by adding or subtracting an equal sliver from each crown panel seam, which changes total circumference without distorting the overall proportions.
Best Fabrics for a Summer Bucket Hat (and What to Avoid)
For a summer sun hat, breathability and UV protection should drive your fabric choices: tightly woven cotton, cotton-linen blends, and lightweight canvas all offer good coverage while staying comfortable in heat. Quilting cotton is the most beginner-friendly option because it presses beautifully, doesn't fray aggressively, and comes in thousands of prints — making it easy to coordinate an outer fabric with a fun lining. Denim adds structure and is surprisingly cool for warm weather given its tight weave, though it's heavier and harder to ease around curves for a first attempt. Avoid stretchy fabrics like jersey or knit entirely — bucket hat patterns are drafted for woven fabrics, and a stretch fabric will deform the shape immediately. For a reversible hat (a popular variation for babies), simply choose two coordinating woven prints and skip the interfacing entirely so the hat can flip either way without a stiff side.
Where to Download an Easy Bucket Hat PDF Pattern
Craftuary offers an instant-download PDF bucket hat sewing pattern sized for both babies and women, designed specifically with beginners in mind — clear illustrations, labeled pattern pieces, and step-by-step instructions are all included in the file. The pattern is available at shopcedarcompass.com and on the Craftuary shop, where it downloads immediately after purchase so you can start printing within minutes. Because it's a digital file, there's no shipping wait and no risk of the pattern getting lost or damaged in transit. The PDF includes multiple sizes in a single download, so you can make a matching mother-and-baby set from one purchase. If you're building your digital pattern library for summer sewing, the bucket hat pairs naturally with other warm-weather projects and is an excellent skill-builder before tackling more complex structured headwear.
Key Takeaways
- A PDF bucket hat sewing pattern prints at home and includes all sized pieces — always print at 100% scale and verify with the test square before cutting fabric.
- The basic construction order is: sew crown panels → attach top crown circle → assemble brim with interfacing → join brim to crown → insert and finish lining.
- Use tightly woven cotton, canvas, or cotton-linen blend for summer sun hats; avoid stretch fabrics entirely as they distort the shape.
- Baby sizes run approximately 17–19 inch head circumference; women's average is 22–23 inches — always measure the wearer before cutting.
- Pressing seams at every stage with an iron is the single biggest quality difference between a polished finished hat and an amateur-looking result.
- A reversible bucket hat requires no interfacing and two coordinating woven fabrics — ideal for babies and an easy way to get two looks from one project.
- Craftuary's instant-download PDF bucket hat pattern covers both baby and women's sizes in a single beginner-friendly file available at shopcedarcompass.com.