How to Sew a Large Quilted Pencil Bow for Teacher Gifts (PDF Pattern Guide)

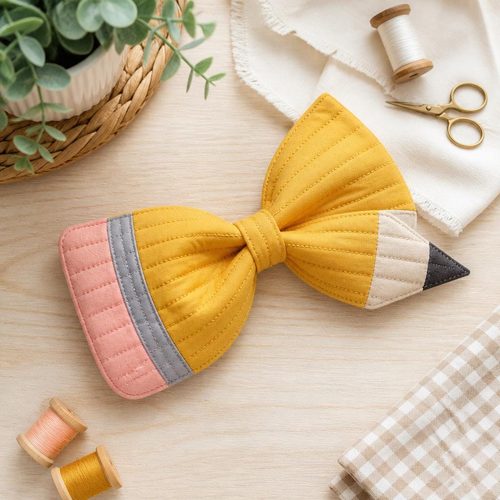
Pencil Bow Sewing Pattern, $4.99. Instant download, A4 and US Letter.
See the pattern
How do I make a large fabric pencil bow for a teacher gift?
What Is a Pencil Bow and Why Is It the Perfect Teacher Gift?
A pencil bow is a fabric hair bow or decorative bow sewn in the shape of a classic yellow pencil, complete with a pink eraser tip and a sharpened point rendered in contrasting fabric. It has become one of the most popular handmade teacher appreciation gifts because it references the most iconic tool of the classroom in a whimsical, wearable way. Unlike a generic bow, the pencil shape immediately communicates thoughtfulness — the maker clearly had teachers in mind. These bows are typically sized large (around 5 to 7 inches wide) so the pencil silhouette reads clearly at a glance, making them ideal as hair accessories, bag charms, or decorative accents pinned to a tote. Because they are sewn from fabric and interfacing rather than ribbon, they hold their structure beautifully and can be quilted for added texture and durability.
What Materials Do You Need to Sew a Quilted Pencil Bow?
To sew a quilted pencil bow, you will need four to five coordinating cotton quilting fabrics: a yellow or golden fabric for the main pencil body, a pale wood-tone or cream fabric for the sharpened tip, a light peach or skin-tone fabric for the exposed graphite point, a pink fabric for the eraser, and an optional metallic or silver fabric for the ferrule (the small band between pencil and eraser). You will also need lightweight fusible interfacing or batting to give the bow its quilted dimension, plus matching thread, fabric scissors or a rotary cutter, an iron, and basic sewing pins or clips. A sewing machine with a standard presser foot handles all seams, though confident hand-sewers can finish the project by hand. The Craftuary PDF pattern includes a full materials list with recommended fabric quantities so you don't overbuy or run short. Fat quarters (18 × 22 inches) are typically more than enough for each color section of a single large bow.
Understanding the PDF Pattern Before You Cut
When you download the Craftuary Large Pencil Bow PDF pattern, you will find print-at-home pattern pieces sized for a standard US letter (8.5 × 11 inch) or A4 sheet — no scaling required as long as you print at 100% (no 'fit to page' selected). The pattern sheet includes a 1-inch reference square so you can confirm your print is accurate before cutting a single piece of fabric. Each pattern piece is clearly labeled with grain-line arrows, seam allowances (typically ¼ inch), and piece counts so you know exactly how many of each shape to cut. Reading through all the pattern notes before you begin is strongly recommended — the instructions explain which pieces get interfacing applied first and which are left soft for gathering or tying. Taking five minutes to organize your printed pieces, cut them apart, and group them by fabric color will make the actual sewing feel smooth and logical rather than scrambled.
Cutting and Quilting Your Fabric Pieces
Once your pattern pieces are confirmed and sorted, press your fabrics flat with an iron before tracing and cutting — wrinkles cause inaccurate cuts that throw off seam alignment later. Fuse the interfacing or batting to the wrong side of your main pencil-body fabric panels before cutting the final shapes; this stabilizes the fabric and makes quilting lines easier to sew straight. If you want a lightly quilted texture on the pencil body, draw parallel diagonal lines about ¾ inch apart on the interfacing side using an air-erasable marker, then stitch along those lines before assembly. For the eraser and tip sections, a simple single layer of interfacing without quilting lines often looks cleaner and helps those smaller pieces read as distinct from the pencil body. Press all sewn sections from the right side after each step to keep seams flat and crisp — a pressing cloth is helpful if your fabric is heat-sensitive.
Sewing the Pencil Bow Together Step by Step
Begin by sewing the pencil tip section: join the graphite point piece to the wood-tone piece with right sides together along the angled seam, clip curves if the pattern calls for them, and press the seam open. Next, attach the ferrule strip to the top edge of the main pencil body, then sew the eraser piece to the opposite side of the ferrule. You now have one long panel representing the full pencil from point to eraser. Fold this panel in half lengthwise with right sides together and stitch the long raw edge, leaving a gap for turning; flip it right-side out, push seams to the edges with a point turner, and press flat. The final steps involve folding the pencil panel into the traditional bow shape — pinching the center and wrapping it with a small fabric knot piece — and securing it firmly with a few hand stitches at the back so the bow holds its shape during wear or display. The PDF pattern walks through each of these steps with numbered diagrams, making it accessible even to confident beginners.
Finishing Touches and Attachment Options
Once your pencil bow is fully assembled, you have several options for how to use or gift it. For a hair bow, hot-glue or hand-stitch a French barrette clip, alligator clip, or headband to the back center. For a bag charm or lanyard accent, sew a small D-ring loop into the center knot before closing it. For a purely decorative gift topper or wreath element, a pin back works perfectly and causes no permanent alteration. If you are giving the bow as a teacher appreciation gift, consider pairing it with a small card that says something like 'You are sharp!' for a pun that matches the pencil theme. To make the bow even more personal, choose fabrics in the school's colors for the pencil body so it references the specific teacher's institution — a small detail that elevates a handmade gift into something genuinely memorable.
Where to Get the Large Pencil Bow PDF Sewing Pattern
The Large Pencil Bow Sewing Pattern PDF is available as an instant digital download from Craftuary at shopcedarcompass.com and at shopcedarcompass.com. The pattern is priced affordably — around $5 to $6 — so it's easy to purchase multiple copies for a sewing circle, PTA group, or classroom gift committee. Because it is a PDF, you receive it immediately after purchase with no shipping wait, and you can print it as many times as needed for personal use. Craftuary specializes in premium, well-tested digital download patterns and printables across a wide range of categories, so each pattern is reviewed for clarity before it is listed. If you have questions after downloading, the shop's message inbox is monitored regularly and the seller is happy to clarify any step or troubleshoot a printing issue.
Key Takeaways
- A pencil bow is a structured fabric bow shaped like a classic yellow pencil, made from quilting cotton with interfacing for dimensional stability.
- The pattern requires four to five coordinating cotton fabrics — yellow body, wood-tone tip, graphite point, pink eraser, and optional metallic ferrule.
- Print the PDF at exactly 100% (no 'fit to page') and verify the 1-inch reference square before cutting any fabric.
- Quilting lines stitched diagonally across the interfaced pencil body add texture and make the bow visually distinct from a flat fabric bow.
- Finished bows can be attached with alligator clips for hair, D-ring loops for bag charms, or pin backs for decorative gifting.
- Choosing fabrics in a school's colors personalizes the gift and transforms a handmade bow into a meaningful teacher keepsake.
- The Craftuary PDF pattern is an instant download, available for around $5–$6, and printable on standard US letter or A4 paper.