How to Sew a Quilted Open-Up Pouch Makeup Bag: Complete Guide for All 3 Sizes

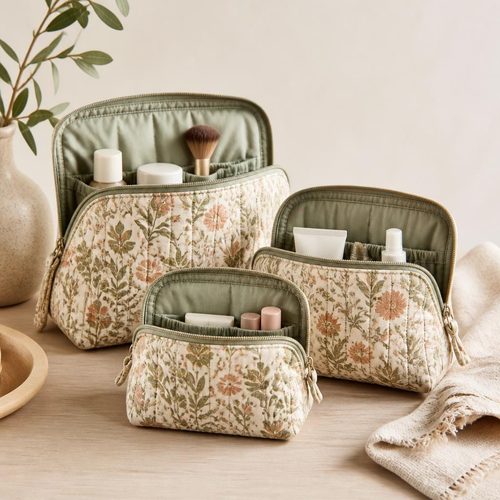
Open Up Pouch Sewing Pattern, $4.99. Instant download, A4 and US Letter.
See the pattern
How do you sew a quilted open-up pouch makeup bag that opens flat for travel?
What Is an Open-Up Pouch and Why It's the Best Travel Makeup Bag Design
An open-up pouch is a zippered bag engineered with a continuous zipper that runs along two or three sides of the top panel, allowing the entire lid to fold back completely flat — like opening a book. This design gives you an instant, unobstructed bird's-eye view of every product inside, which is why it has become a favorite among travelers who are tired of digging through cylindrical toiletry bags in a dim hotel bathroom. When laid flat on a countertop, the bag doubles as a small organizing mat, keeping your makeup and skincare off unfamiliar surfaces. The quilted exterior adds enough structure that the bag holds its rectangular shape even when only half-full, which prevents the dreaded collapsed-bag problem that plagues soft, unlined pouches. Unlike store-bought organizers, a handmade quilted version can be sized precisely to your carry-on, personalized with your fabric choices, and constructed from materials that actually last — making it a genuinely practical project rather than just a decorative one.
Materials You Need Before You Start Cutting
To sew a quilted open-up pouch, you will need an outer fabric — quilting cotton, canvas, or a bold preprinted panel all work well — plus a coordinating lining fabric in a similar weight. You also need fusible fleece or low-loft quilt batting for the exterior layer, which is what creates the padded, quilted look and gives the finished bag its body. A continuous zipper (also called zipper by the yard) or two standard nylon coil zippers cut to length are required, along with a zipper foot for your sewing machine — this is not optional, because without it you cannot stitch close enough to the zipper teeth for a clean seam. For the small and medium sizes, plan on roughly half a yard each of outer and lining fabric, making this an excellent scrap-friendly project. Medium-weight fusible interfacing applied to the lining panels will help the bag stand open on its own when unzipped, which elevates the finished look considerably.
Choosing Between the Three Sizes: Small, Medium, and Large
The small size, approximately 5 inches by 8 inches when zipped closed, is perfect for a slim daily essentials pouch, a lip product organizer, or even a pencil case — it is also the fastest to complete if you want a quick gift. The medium size, roughly 7 inches by 10 inches, is the classic travel makeup bag dimension: it fits inside a quart-sized TSA bag, slips easily into a carry-on pocket, and is large enough to hold foundation, mascara, a brush, and a few extras without feeling cramped. The large size, around 9 inches by 12 inches, functions best as a full toiletry organizer, a sewing notions bag, or a charger-and-cable travel pouch — it is spacious enough to hold a surprising volume of small items when fully opened flat. Beginners are generally advised to cut their teeth on the medium size, since it provides enough fabric real estate to practice the corner-clipping zipper technique without feeling overwhelming. Once you have completed one size, the other two follow the exact same construction sequence, so scaling up or down for a matching gift set takes far less effort than the first version did.
Cutting and Quilting the Exterior Panels First
Cut your outer fabric and batting to the dimensions specified in the pattern for your chosen size, then layer them with the batting directly beneath the outer fabric, right side up, and baste around the entire perimeter using a long machine stitch or a light coat of temporary spray adhesive. Quilting the exterior is done before any bag assembly begins — this is the single most common order-of-operations mistake beginners make, and doing it out of sequence makes the rest of the construction far more difficult. Straight parallel lines stitched ½ inch to 1 inch apart, either on the diagonal or vertically, create a classic quilted grid; free-motion stippling or echo quilting around a printed motif are also beautiful options if your machine has a darning foot. After quilting, trim the panel back to the original cut dimensions using your rotary cutter and ruler, because the quilting process naturally draws up the fabric by a small amount. Press the trimmed panel with a hot iron and a press cloth before moving forward — this removes puckering and ensures your seam lines will be accurate when you begin assembly.
Installing the Zipper: The Technique That Makes the Bag Open Flat
The U-shaped or three-sided zipper is what defines the open-up pouch, and the quality of this step determines whether the finished bag lies completely flat or puckers stubbornly at the corners. Begin by basting the zipper tape to the top edge of the quilted outer panel with right sides together, using a scant ¼-inch seam allowance and your zipper foot, then clip the zipper tape at each corner with small diagonal cuts so it can pivot around the turn without pulling or bunching — most tutorials skip this step entirely, and it is the single most important detail for a professional result. After the zipper is basted to the outer panel, place the lining fabric on top with right sides together, sandwiching the zipper tape between the two layers, and stitch along the same seamline to enclose the tape cleanly. Press the seam allowance away from the zipper teeth on both the outer and lining sides before topstitching, which both flattens the seam and prevents fabric from snagging in the zipper during use. Repeat this process for the opposite long edge and, if your pattern calls for it, the short connecting edge before proceeding to final assembly.
Assembling and Finishing the Bag
Before sewing the bag shut, open the zipper at least halfway — if you skip this step and sew around the entire bag with the zipper closed, you will have no way to turn the project right-side out and will need to seam-rip your way out of the mistake. Align the two outer panels right sides together and the two lining panels right sides together, then stitch around all remaining raw edges with a ½-inch seam allowance, leaving a 3-to-4-inch turning gap in the center of the lining bottom. Trim the corners diagonally to reduce bulk — a single snip at a 45-degree angle about ⅛ inch from the corner stitch is sufficient — then turn the bag right-side out through the lining gap and use a blunt point turner or chopstick to push each corner fully into shape. Press the entire bag flat, fold the turning gap seam allowances inward, and close the gap with a slip stitch or a tight machine topstitch close to the edge. Tuck the lining into the bag, press the zipper edges one final time, and add a topstitch along the top opening if desired — this step is optional but gives the bag a crisp, store-quality finish that makes the quilted exterior stand out even more.
Downloading the Pattern and What the PDF Includes
The Craftuary open-up pouch PDF sewing pattern is available as an instant digital download from our shop, meaning you can purchase, print, and begin cutting fabric within minutes of checkout — no shipping wait, no postage cost, and no risk of a pattern arriving damaged. The download includes printer-ready pattern sheets formatted for US letter (8.5 by 11 inches) with a simple scaling note for A4 printers, a complete materials and yardage list for all three sizes, numbered step-by-step instructions with diagrams at each key construction point, and a bonus zipper-installation reference card you can pin above your sewing machine. The instructions are written for confident beginners and intermediate sewists who are comfortable with straight-line stitching and have installed at least one zipper before; total construction time for the medium size runs approximately two to three hours for a focused beginner. The pattern also includes guidance on substituting faux leather, laminated cotton, or waterproof ripstop nylon for the outer fabric if you want a more utilitarian travel bag that wipes clean. Once you have purchased the file, it is yours to print and use as many times as you like — for personal projects, gifts, and handmade items for sale in quantities consistent with the included license terms.
Key Takeaways
- An open-up pouch unzips along two or three sides so the entire top folds flat, giving instant full access to contents — the key feature that makes it superior for travel organization
- Quilt the exterior panels before any assembly begins; doing this step out of sequence is the most common beginner mistake and makes construction significantly harder
- Clip the zipper tape diagonally at each corner before stitching — this single technique is what allows the bag to open completely flat without puckering
- The pattern comes in three sizes (small, medium, large) that serve different use cases and can be sewn as a coordinating gift set from the same yardage
- Fusible fleece on the exterior and medium-weight interfacing on the lining give the finished bag enough structure to stand open on a countertop on its own
- The Craftuary PDF is an instant download — purchase at shopcedarcompass.com, print at home on US letter or A4, and start cutting the same day