How to Sew a Bohemian Sling Bag: Complete DIY Tote Hobo Bag Guide

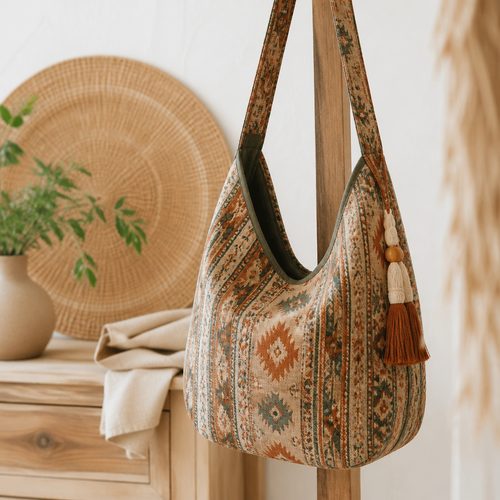
Bohemian Sling Bag Pattern, $4.99. Instant download, A4 and US Letter.
See the pattern
How do I sew a bohemian sling bag at home?
What Is a Bohemian Sling Bag (and Why Sew Your Own)?
A bohemian sling bag — sometimes called a boho hobo bag or tote sling — is a crescent- or kidney-shaped bag worn diagonally across the body, typically made from soft, textured, or natural fabrics like canvas, linen, suede, or woven cotton. Its defining characteristic is a relaxed, unstructured silhouette that drapes against the hip, paired with an adjustable strap long enough to sling over one shoulder or across the chest. Sewing your own gives you complete control over fabric choice, strap length, and interior layout — things that matter enormously for everyday wearability. Compared to buying a finished bag, a DIY version costs a fraction of the retail price: most home sewists complete this project for $8–$15 in materials. Using a printed or downloadable PDF sewing pattern removes the guesswork from cutting and assembly, especially for sewists who are newer to bag construction.
Materials and Tools You'll Need Before You Cut
For a standard bohemian sling bag, you'll need approximately 3/4 yard of exterior fabric (canvas, denim, or a woven cotton work best for structure), 3/4 yard of lining fabric, and 1/4 yard of fusible interfacing to stabilize the body panels. Hardware includes one swivel clip or D-ring for strap attachment, one magnetic snap or zipper (12–14 inches) for the main closure, and either a 1.5-inch wide adjustable slider buckle or a set of O-rings if you prefer a fixed-length strap. You'll also want coordinating thread, fabric scissors or a rotary cutter and mat, pins or wonder clips, and a sewing machine with a denim or universal needle — size 90/14 is ideal for medium-weight canvas. Iron your interfacing before you begin cutting: a smooth, wrinkle-free base piece ensures your finished bag keeps its shape over time. If your fabric has a directional print or stripe, buy an extra 1/4 yard to account for pattern matching at the seam lines.
Understanding the Sewing Pattern Pieces
A typical bohemian sling bag PDF pattern includes three to five main pieces: the front/back body panel (often cut twice on the fold), a gusset or side panel that runs along the bottom and sides to give the bag depth, a strap piece, and one or two interior pocket rectangles. When you download a PDF pattern, print it at 100% scale (no 'fit to page') and verify the test square on the first page measures exactly as labeled — usually 1 or 2 inches — before taping your sheets together. Seam allowances are almost always included in digital bag patterns, commonly 3/8 inch or 1/2 inch, and the pattern notes will specify which. Mark every notch, dart, and hardware placement dot onto your fabric using a water-soluble marker or tailor's chalk; these small marks are what ensure your strap anchor sits symmetrically on both sides. If the pattern includes a video tutorial, watch the full video once before touching your fabric — bag construction often has counterintuitive steps like attaching hardware before the lining is closed, and seeing the sequence first prevents costly rework.
Step-by-Step: Assembling the Sling Bag Body
Begin by fusing your interfacing to the wrong side of your exterior body panels, pressing firmly with a hot iron and a damp pressing cloth for 10–15 seconds per section. Attach your magnetic snap or install your zipper to the exterior top edge before you sew any side seams — it is much easier to work with a flat panel than a partially constructed bag. Sew the gusset to the exterior front panel first, clipping curves every half inch so the fabric lies smooth, then repeat for the back panel, creating a completed exterior shell. Construct your lining in the same sequence, but leave a 4–5 inch opening along the bottom seam — this is your turn-through gap. Place the exterior and lining right sides together, align the top edges, and sew around the entire opening; then reach through the lining gap to pull the bag right-side out, press the top edge crisp, and topstitch 1/8 inch from the edge to hold everything flat. Close the lining gap with a ladder stitch by hand or edgestitch it on the machine, then tuck it back inside the bag.
Attaching the Adjustable Strap
The strap is what transforms a simple tote into a true sling or crossbody bag, and getting its length right makes the difference between a bag that sits comfortably at the hip and one that constantly slides. Cut your strap fabric on the straight grain for stability, fold it into thirds lengthwise, press, then fold and press again so all raw edges are enclosed — this produces a clean four-layer strap without any exposed seam. Edgestitch both long sides of the strap closely, then thread one end through your swivel clip, fold over 1.5 inches, and stitch a secure box-X pattern (a rectangle with an X through it) to lock the hardware in place. For an adjustable strap, thread the opposite end through the center bar of your slider buckle, loop it back through the D-ring on the bag body, and then back through the buckle again — this creates a smooth slide that holds its position under weight. A finished strap length of 48–55 inches total (before the adjustable portion is set) works for most adults wearing the bag as a crossbody; shorten to 40–45 inches for a shoulder-only carry.
Fabric and Style Variations for a Boho Aesthetic
The bohemian look is largely achieved through fabric and trim choices rather than changes to the pattern itself, which means one pattern can produce dramatically different results depending on your materials. Woven Aztec or kilim-style cotton fabric gives an immediately recognizable boho vibe, while natural undyed canvas with leather fringe trim reads as earthy and minimalist. Velvet or jacquard fabric elevates the same silhouette into something festive-market worthy, and patchwork panels from coordinating fat quarters are a popular zero-waste approach. For hardware, antique brass or matte black metal finishes complement bohemian aesthetics far better than chrome, and swapping a standard zipper pull for a tassel made from embroidery floss takes less than five minutes but makes a striking difference. On the interior, a patterned or bright lining — often in a contrasting print — is a beloved boho detail that makes the bag feel curated and handmade in the best sense.
Common Mistakes and How to Avoid Them
The most frequent mistake beginner bag makers make is skipping interfacing on the exterior panels, which results in a floppy bag that loses its shape after a few uses — always interface the body pieces, and consider interfacing the strap as well if your fabric is light. Uneven curves are the second major pitfall: when sewing a curved gusset seam, sew slowly and pivot the fabric every inch or two rather than trying to steer through the entire curve in one motion. If your bag puckers along the bottom curve after turning right-side out, your clip spacing was too wide — re-press the seam with steam and clip more densely next time. Skipping the topstitch step around the bag's opening is tempting when you're eager to finish, but that single line of stitching is what keeps the lining from creeping out during use. Finally, test your magnetic snap placement by closing the bag with the snap before sewing it permanently — a snap positioned even 1/4 inch off-center will cause the bag opening to gape or pucker, and repositioning a metal snap after installation is genuinely difficult.
Key Takeaways
- A bohemian sling bag requires approximately 3/4 yard exterior fabric, 3/4 yard lining, fusible interfacing, and basic hardware including a swivel clip and adjustable slider buckle.
- Always print PDF sewing patterns at 100% scale and verify the test square before cutting fabric.
- Install zippers or magnetic snaps on flat exterior panels before constructing the bag body — it is significantly easier than retrofitting hardware later.
- The strap box-X stitch is the critical stress point of the bag; reinforce it with a slow machine stitch or double-pass for safety.
- Fabric choice drives the bohemian aesthetic more than the pattern shape — Aztec cotton, velvet, patchwork, and natural canvas all work beautifully with the same base pattern.
- Leave a 4–5 inch turn-through gap in the lining bottom seam, and close it cleanly with an edgestitch or hand ladder stitch for a professional finish.
- A finished adjustable strap of 48–55 inches suits most crossbody carry preferences; shorten for shoulder-only wear.
- The Craftuary DIY Bohemian Sling Bag Sewing Pattern includes a video tutorial, making it accessible to intermediate and confident beginner sewists alike.