How to Make a Memory Bear from a Loved One's Clothing (Complete Sewing Guide)

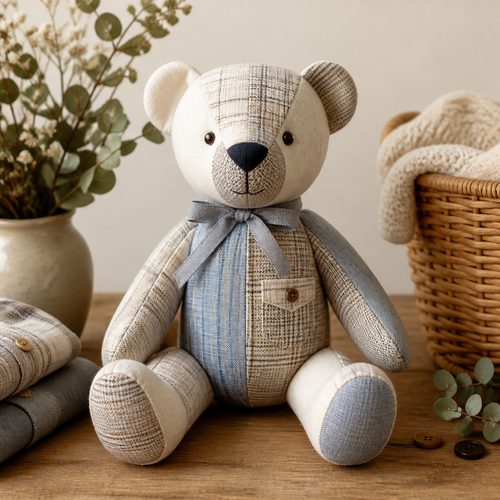
Memory Bear Pattern, $4.99. Instant download, A4 and US Letter.
See the pattern
How do you make a memory bear from a loved one's clothing?
What Is a Memory Bear and Why Do People Make Them?
A memory bear is a handmade stuffed teddy bear sewn from the clothing of someone who has passed away, or sometimes from a milestone garment like a baby's first outfit or a wedding dress. The finished bear preserves the fabric, texture, and even the scent of the original garment in a three-dimensional keepsake that can be held and displayed for decades. Unlike a quilt or shadow box, a memory bear is tactile and comforting — particularly for children who have lost a parent or grandparent and need something tangible to hold. They are given as sympathy gifts, made for grieving families, and commissioned by crafters who specialize in memorial sewing. A quality sewing pattern is the single most important ingredient: it determines the finished size, the ease of construction, and how well the bear's seams hold up over years of handling.
Choosing the Right Sewing Pattern for a Memory Bear
Not all stuffed animal patterns are designed to handle the varied weights and weaves found in repurposed clothing — dress shirts, flannel pajamas, denim, and knit fabrics all behave differently under the needle. A pattern written specifically for memory bears will include instructions for stabilizing stretchy or loosely woven fabrics, usually by fusing interfacing to the wrong side before cutting. Look for a pattern that offers multiple size options (small, medium, and large bears accommodate different amounts of available fabric), and check that the seam allowances are clearly marked, since tight curves on ears and paws require precision. Digital download patterns from shops like Craftuary are ideal because you can print them immediately, resize them on your home printer if needed, and reuse the file for multiple bears without worrying about a paper pattern wearing out. Patterns priced in the $6–$8 range represent the sweet spot for home sewists: they include detailed illustrations and are tested for clarity, without the steep licensing fees attached to major commercial pattern brands.
What Clothing and Fabrics Work Best
Woven fabrics with a stable weave — oxford cloth shirts, cotton flannel, chambray, quilting cotton, and lightweight denim — are the easiest to work with and produce the sharpest seam lines on a small bear. Knit fabrics like T-shirt jersey, sweatshirt fleece, and athletic wear can absolutely be used, but they require a ballpoint needle, a small zigzag or stretch stitch, and a layer of lightweight knit interfacing to prevent the seams from tunneling or stretching out of shape. Avoid very heavy materials like thick wool coats or structured suiting for your first project; while beautiful, they make it difficult to turn small pieces like ears right-side-out and can cause lumpy seams at the joints. Sentimental items that are thin, stained, or damaged can still be used — simply fuse interfacing over the damaged area and cut around it, or feature the stain on a less-visible part of the bear like the back or inner leg. Most memory bear patterns are designed to use one to two adult dress shirts or one pair of adult trousers, so you rarely need to worry about running out of fabric.
Tools and Supplies You'll Need Before You Start
Beyond the sewing pattern itself, you will need sharp fabric scissors or a rotary cutter and mat, straight pins or fabric clips, a washable fabric marker or tailor's chalk for tracing pattern pieces, and a sewing machine capable of a straight stitch — even a basic entry-level machine is sufficient. Polyester fiberfill is the standard stuffing for memory bears; it is washable, hypoallergenic, and holds its shape over time, unlike cotton batting which compresses with handling. You will also need a hand-sewing needle and strong thread in a matching color to close the final opening after stuffing, a technique called a ladder stitch or slip stitch. Optional but highly recommended supplies include safety eyes (8mm to 12mm depending on bear size), a long doll needle for attaching limbs if the pattern uses jointed construction, and fusible web interfacing for stabilizing delicate or stretchy fabrics. Having all supplies assembled before you cut a single piece of the garment is especially important with memorial sewing, since the fabric is irreplaceable.
Step-by-Step: Cutting and Preparing the Garment
Before cutting, wash and dry the clothing item as you normally would — this pre-shrinks the fabric and ensures the finished bear won't distort after its first cleaning. Lay the garment flat and iron out all wrinkles; accurate cutting depends on smooth fabric, and memory fabrics often have creases from long storage. If the fabric is a knit or loosely woven, now is the time to fuse interfacing to the wrong side of any sections you plan to use — cut the interfacing slightly larger than your largest pattern piece and press it on before you cut the actual shapes. Arrange the pattern pieces on the fabric strategically: if the garment has a special element like a pocket, a monogram, a plaid stripe, or a distinctive button placket, position a pattern piece so that feature will be centered and visible on the finished bear. Trace each piece with fabric marker, double-check that you have cut the correct number of mirrored pairs (most patterns require two ears, two arms, two legs, and a left and right body piece), and label each cut piece with a small pin or sticky note to avoid confusion during assembly.
Sewing, Stuffing, and Finishing Your Memory Bear
Sew all small pieces first — ears, paws, and inner-ear contrast pieces — so you build confidence before tackling the larger body seams. Most memory bear patterns sew the head as a separate unit that is then attached to the body, which allows you to stuff and shape the head independently for a rounder, more defined look. When you reach the stuffing stage, add fiberfill in small handfuls rather than large clumps, working it into the nose, ears, and paws before filling the main cavity; this prevents lumpy air pockets and gives the bear a firm, even shape. Leave the stuffing opening accessible and use a ladder stitch to close it — this hand-stitch creates an invisible seam by alternating small horizontal stitches on each side of the opening, and when pulled snug it disappears entirely into the seam line. Finally, if your pattern includes embroidered or sewn facial features, stitch them on last so they are positioned symmetrically on the fully stuffed, shaped head; a face drawn on a flat unstuffed head will look very different once the bear has volume.
Frequently Asked Questions About Memory Bear Patterns
Can I make a memory bear without a sewing machine? Hand sewing is possible but very time-consuming; the curved seams on a bear body benefit greatly from the consistency of a machine stitch, and the seams need to be strong enough to withstand years of handling. How much of the original garment is preserved? A standard medium-sized memory bear typically uses the equivalent of one adult shirt front and back, meaning the majority of the original garment is present in the finished bear. Are memory bears appropriate as gifts for children? Yes — they are one of the most common grief support tools recommended for young children, and a bear made from a grandparent's flannel shirt or a parent's work uniform gives a child something concrete to hold onto. Can I make memory bears to sell? If you use a downloadable sewing pattern that includes a commercial license (always check the shop's licensing terms), you may typically sell finished bears; Craftuary patterns include clear licensing language in the file so you know exactly what is permitted. How long does it take to make one bear? Most intermediate sewists complete a memory bear in three to five hours, while beginners working carefully with a detailed pattern should budget a full day of relaxed sewing.
Key Takeaways
- A memory bear sewing pattern designed specifically for repurposed clothing will include guidance on stabilizing knits, handling varied fabric weights, and positioning sentimental details like pockets or monograms.
- Fusible interfacing is the most important prep step for stretchy or delicate memorial fabrics and prevents seam distortion in the finished bear.
- Digital download patterns priced around $6–$8 offer immediate access, unlimited reprints, and detailed illustrated instructions without the fragility of a single paper pattern.
- One to two adult garments typically provide enough fabric for a standard medium memory bear, and damaged or thin areas can be reinforced with interfacing and positioned on non-visible sections.
- The ladder stitch closing technique and small-handful stuffing method are the two most critical hand-finishing skills for a professional-looking result.
- Always verify the commercial license terms of a pattern before selling finished memory bears — reputable digital shops include explicit licensing language in the download.