How to Crochet a Woodland Raccoon: Techniques, Tips, and Gift Ideas for Your Amigurumi Project

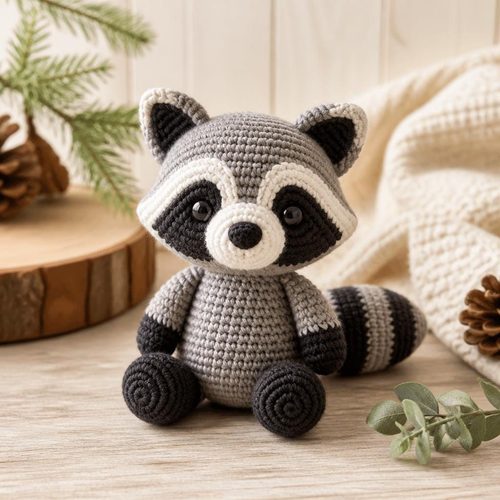
Woodland Raccoon Crochet Pattern, $4.99. Instant download, A4 and US Letter.
See the pattern
How do you crochet a woodland raccoon amigurumi and what techniques do you need to know?
What Makes a Woodland Raccoon Crochet Pattern Unique
Crocheting a woodland raccoon stands apart from other amigurumi projects because of the animal's distinctive two-toned facial mask and ringed tail — both of which require intentional color-change technique to look polished rather than sloppy. Unlike a simple sphere-bodied creature, raccoons have a recognizable silhouette with rounded ears, a slightly pointed snout, and a chunky, ring-patterned tail that needs structural shaping. A well-designed raccoon pattern will walk you through these features step by step, often using separate pieces that are sewn together at the end for cleaner definition. The woodland aesthetic also typically calls for nature-inspired yarn colors — soft grays, warm creams, and deep charcoal — that create a cohesive, storybook look. When you download a three-page PDF pattern, those three pages are densely packed: one page typically covers materials and abbreviations, one covers the body and head construction, and the third covers the tail, ears, and assembly.
Materials You'll Need Before You Start
For a standard woodland raccoon amigurumi, you'll want a worsted-weight or DK-weight yarn in at least three colors: a medium gray for the body, a dark charcoal or black for the mask and tail rings, and an off-white or cream for the chest and facial highlights. A size 3.5mm or 4.0mm crochet hook pairs well with worsted weight and gives your stitches enough tension to keep the stuffing from showing through — this is especially important for amigurumi where the fabric needs to be tight and dense. You'll also need polyester fiberfill stuffing, a yarn needle for seaming and weaving in ends, and a pair of 6mm to 9mm black safety eyes, which should be inserted before the head is fully closed. Stitch markers are non-negotiable for working in the round; without them, it's remarkably easy to lose your place in a magic ring sequence and end up with a lopsided head. Having small scissors, pins for holding pieces in place during assembly, and a ruler to check gauge will save you significant frustration during the finishing stages.
Core Crochet Techniques the Pattern Uses
The foundation of any amigurumi raccoon is the magic ring — a technique that closes the starting center of your rounds so tightly that no hole remains, which is critical for heads and bodies. From there, the pattern works in continuous rounds using single crochet stitches, with regular increase rows (typically two single crochets into one stitch) to expand the sphere and decrease rows (crocheting two stitches together) to close it. Color changes in amigurumi are done mid-round or at round endings depending on the pattern's design; for the raccoon's mask, you'll likely surface-embroider or work a separate flat piece that gets sewn on, since a clean mask edge is very difficult to achieve by switching yarn colors mid-round in a curved shape. The tail uses a striped tubular construction — alternating gray and charcoal rounds — and may require a wire armature insert if the pattern specifies a poseable tail. Understanding how to invisibly decrease (inserting your hook under the front loops only) will make your finished raccoon look far more professional than using standard visible decreases.
Tips for Nailing the Raccoon's Signature Markings
The raccoon's facial mask is the single most impactful detail in the finished project, so it's worth slowing down here even if the rest of the construction moves quickly. Many patterns provide a flat mask piece that is crocheted separately in black or dark charcoal and then pinned and whipstitched onto the finished face — take time to center it symmetrically before sewing, using pins and stepping back to check from a distance. The eye placement matters enormously: position your safety eyes through both the mask layer and the head layer simultaneously so they appear to sit naturally within the dark mask rather than floating above it. For the tail rings, carrying the unused yarn color loosely up the inside of the tube (rather than cutting and rejoining each stripe) keeps your tension consistent and reduces the number of ends to weave in. A small amount of blush or chalk pastel rubbed onto the inner ear sections with a cotton swab adds a lifelike rosy tint that elevates the whole woodland creature look without any additional sewing.
Assembly and Finishing for a Professional Result
Amigurumi assembly — the step where you sew all the separate limbs, ears, tail, and snout onto the main body — is where many beginners feel the most uncertainty, but a systematic approach makes it manageable. Start by pinning all pieces into position before sewing a single stitch; this lets you step back, adjust, and get the proportions right before you commit. Use long straight pins and leave them in place while you work, sewing each piece with a yarn needle and a strand of matching yarn using a whipstitch that catches the body fabric with each pass. Stuff the body and head firmly but not so tightly that the yarn stretches or the seams pucker — you want the finished creature to hold its shape without visible yarn gaps. Weave in all yarn tails on the inside of the piece using your yarn needle, running the tail in multiple directions through the fiberfill so it doesn't work its way back out with handling over time.
Gifting a Handmade Crochet Raccoon: Ideas and Presentation
A finished crochet woodland raccoon makes an exceptionally thoughtful handmade gift because it occupies that rare category of item that feels both artisan-crafted and universally appealing across ages. For a child's gift, pair the raccoon with a small woodland-themed picture book and tuck both into a kraft paper gift box lined with tissue in forest green or brown; the combination creates a storybook-ready presentation that feels curated rather than assembled. For an adult who loves cottagecore or woodland aesthetics, the raccoon looks beautiful displayed on a bookshelf or desk alongside natural elements like a small pinecone, a sprig of dried eucalyptus, or a tiny acorn, and you can present it in a clear cellophane bag tied with twine for a farmers-market-style gift feel. Baby shower gifts benefit from using a baby-safe alternative to safety eyes — embroidered eyes in black yarn — and ultra-soft amigurumi-specific yarn so the toy is safe for young children. Because the pattern is a printable PDF download, you can purchase it instantly from Craftuary and begin your project the same day, making it an ideal choice when you need a meaningful handmade gift on a short timeline.
Frequently Asked Questions About Woodland Raccoon Crochet Patterns
Is a woodland raccoon amigurumi suitable for beginners? Yes, with one caveat: you should be comfortable crocheting in continuous rounds and working a magic ring before you begin, as the pattern assumes familiarity with those two foundational techniques — everything else is explained within the instructions. How long does it take to finish? Most crocheters with intermediate experience complete a standard-sized raccoon (approximately 6–8 inches tall) in four to eight hours spread across one or two evenings, though the assembly and finishing stage can add another hour if you take your time with placement. Can I sell finished items made from the pattern? This depends on the specific pattern's licensing terms, which are spelled out on the listing page; Craftuary patterns typically include personal use and small-batch cottage-industry selling rights, but always verify before listing finished items. What yarn brands work best? Yarnspirations Caron Simply Soft, Lion Brand Pound of Love, and Paintbox Simply DK are all widely recommended for amigurumi because they have a smooth, consistent ply that makes stitch definition clear in photographs and in person. Can the pattern be printed at home? Absolutely — the three-page PDF is formatted for standard 8.5 x 11-inch letter paper and prints cleanly on any home inkjet or laser printer; many crocheters also keep it open on a tablet for paperless crafting.
Key Takeaways
- A woodland raccoon amigurumi requires at least three yarn colors — medium gray, charcoal, and cream — plus safety eyes, fiberfill, and a 3.5–4.0mm hook.
- The magic ring, invisible decrease, and single crochet in continuous rounds are the three core techniques used throughout the pattern.
- The raccoon's facial mask is crocheted as a separate flat piece and sewn onto the finished face for the cleanest, most symmetrical result.
- Pinning all limbs and appendages before sewing any of them permanently is the single most important assembly tip for a professional-looking finish.
- The Craftuary three-page PDF pattern is an instant digital download available at shopcedarcompass.com, printable at home on standard letter paper.
- A finished crochet raccoon makes an ideal gift for woodland or cottagecore aesthetics, baby showers (with embroidered eyes), or children's nursery décor.
- Intermediate crocheters typically finish the project in four to eight hours, making it viable as a last-minute handmade gift.